The first time you run StarShip, the StarShip Setup Wizard appears. The Setup Wizard enables you to easily configure each StarShip module by prompting you for all necessary information. It also describes all options in detail.
When using the wizard, click Next to move to the next setup module. When a module has been set up, a green check mark will appear next to the module, indicating that it is complete. The data you enter will be saved when you click the Finish button at the end of setup.
It is advisable to configure each section in the order listed, as information from one section may be used to fill in fields for a later section. The Setup Wizard will automatically appear each time you launch StarShip until you click the Finish button.
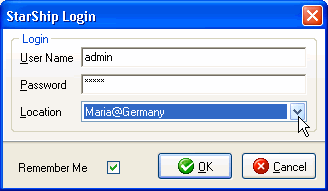
If you have multiple login locations, you will need to click Finish for each location. The location can be selected from the Location drop-down list on the Login dialog. You can also set up the login to "remember" your User Name and Password based on the Windows user.
You may return to the Setup Wizard at any time by selecting Setup > Initial Setup from StarShip's main menu. You can also set up and configure any module from the StarShip Setup menu.
Note : In order to manage users, the Administrator will need to log in with the default Admin ID and Password. The default ID is "admin" and the default password is "admin." The default Admin user account can be modified in StarShip Server Manager, under Tools > Users.
When you're filling out the setup wizard forms, some fields require you to enter or set a value - these are generally noted by a blue field heading. You must complete required fields before the wizard will allow you to continue with subsequent topics.
Once you have completed a dialog, click Next to proceed to the topic that follows it. You can also use the left-hand navigation panel to move from topic to topic. A completed topic is indicated by a check mark next to the topic name.
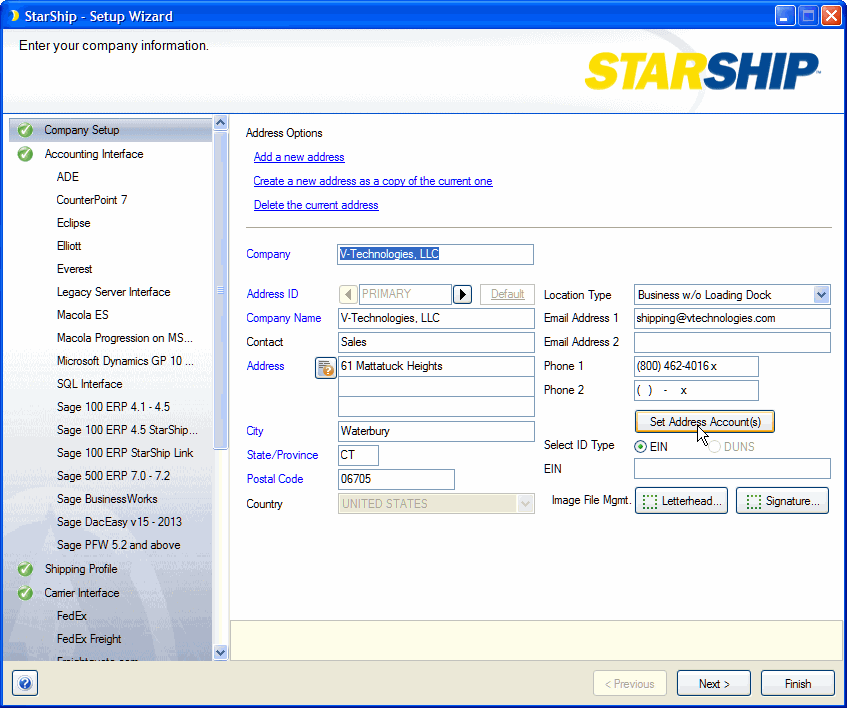
This form allows you to enter your company address, create new addresses, and configure general company settings.
Set Address Accounts is used to select the Carrier Interface account that is associated with a particular address. If you have multiple carrier interface accounts, each address can be set to use different default carrier interface accounts when rating and shipping. Click the Set Address Accounts button and then select the account to use for each carrier interface from the Account drop-down list. You can also choose "None" or "Use Default", which will use the designated default account for that carrier interface (set under Setup > Carrier Interface). Also, if you haven't yet added accounts for the carrier interfaces, then the choices will always be Default and None.
In this section, you set up your source interface. StarShip allows you to import and ship with more than one set of company information. For each company, you can assign a specific interface that includes your customized field mapping and data translations. Setup may be different
Click the Add Company button.
From the Company field, select
the company from your source interface.
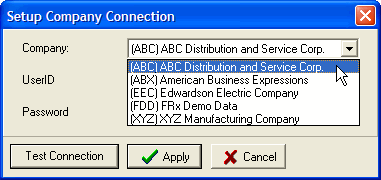
Enter the User ID and Password.
Click the Test Connection
button to confirm that StarShip has successfully connected to the
company. Click OK.
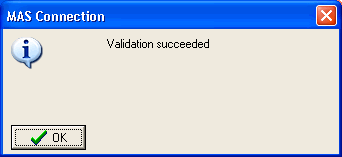
Click Apply.
The company now appears in the company list.
You can add multiple companies by repeating these steps. StarShip will connect to the last company used based on the user ID and location.
1. Click Create
Connection.
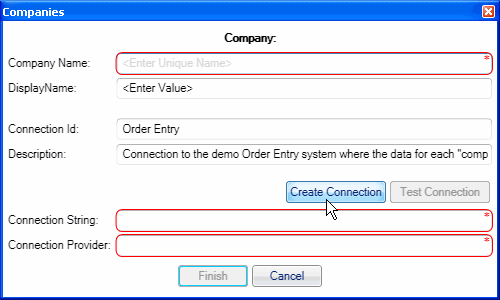
2. Define the
connection parameters.
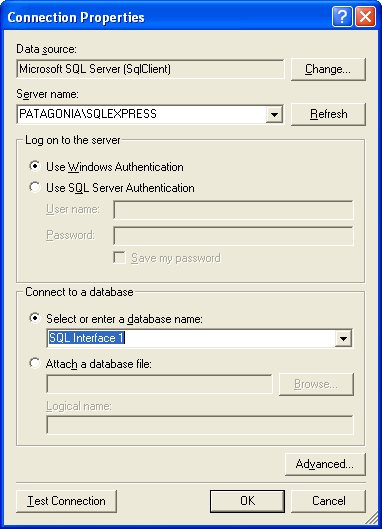
3. Click OK.
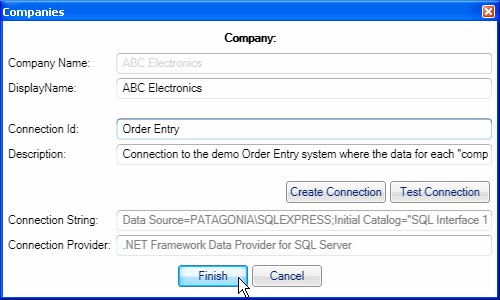
The Company Name field will be populated. In the case of multiple companies,
one can be selected from a drop-down list.
The connection is automatically tested when you click OK and exit the dialog.
For each company you add, you can customize the default interfaces that are provided. For more information, see the Customize Interface section.
Each section helps you to configure the basic settings to use when processing shipments.
For freight shipments, use the definitions provided to select Straight or VICS.
See table of BOL settings and example BOL printouts
Designate the criteria used to classify each item in a freight shipment. The NMFC code is used by freight carriers to rate shipments. To provide more detail about each item being shipped, select the NMFC, Subcode, and Class option. Note that the details provided with this option are required when using a VICS BOL format.
Using the visual examples provided, decide how items will be grouped on the Bill of Lading for freight carrier shipments.
When you choose Yes, StarShip generates the BOL# and displays it in the Shipment tab under General Information for freight carrier shipments.
If you choose No, you will need enter the BOL# manually on the Shipment tab.
Rolling Number : A rolling number is required when automatically generating the Bill of Lading number and the value entered will be used as the next BOL #.
Sample BOL# : This field is for display only. The Sample BOL# that is displayed is the BOL# that will be assigned to the next shipment. It will contain the values from the BOL # Prefix, Rolling Number, and Rolling Number Size. This data displays in the Shipment tab under General Information section and when you click Print Shipment on the toolbar.
Based on the descriptions provided, decide whether or not you want to use the Shipping Assistant for Freight and Parcel shipments.
You can tell StarShip how to pack items into packages using packaging scenarios. They can be manually entered or StarShip can learn how you pack items when you save shipments.
Decide if you want to use packaging scenarios for Freight and Parcel shipments.
StarShip can perform the automatic packaging in a number of ways. Each selection in the drop-down list provides you with a detailed description of each method.
Based on the descriptions provided, select how you want StarShip to package items.
This option allows you to keep track of package contents, and affects how users can pack items when using the Shipping Assistant or while using the Package View grid at the bottom of the shipping window.
You may need to track package content detail for EDI or label requirements; enable this setting when you want StarShip to be able to print a package label that defines the package contents.
Select the default packaging type and pallet type for shipments. Your selection here will be the default packaging type and pallet type when items are packed for a shipment.
From this dialog, you can also maintain packaging (add, configure, or delete packaging) or import packaging.
For freight shipments, check this option if you want StarShip to automatically place all loose items and packages onto one pallet. Note that if you are manually entering the BOL and have this setting enabled, you may not see the number of labels you expect.
Enable this setting to automatically print the shipping label for a package when the user clicks Next to go to the next package on the Shipping screen. The shipper will automatically be prompted for the total package count in the parcel shipment (for certain carriers) before printing any labels. See examples
For each carrier interface, add and configure the accounts you will use for electronic rating and shipping, including the carriers you will use for manual processing. For more information, click the following links:
Manual Processing (Freight shipments only)
As additional carrier modules are available, they will be added to the documentation.
If applicable, select Yes to add and configure the 3PL companies you use for alternative billing purposes.
Here you can add a new 3PL or delete current ones.
3PL ID : Type in a unique ID for the 3PL company.
Address Information: Type in the address and contact information for this 3PL company. Blue field headings indicate required fields.
Phone Number/Fax Number : Enter the 3PL company phone and fax information. Limited to 10 characters each, with a phone extension of up to 5 digits.
This section shows the carrier interface/account - carrier combinations that will use the currently selected 3PL as the default prepaid billing type. You can also set this up for manually processed shipments.
Using the drop-down lists, first select the account under the carrier interface, and then, in the right-hand column, place a check next to each carrier you want to include under that account.
StarShip will display a list of Windows printers that have been added for this machine. This section allows you to define printers, shipment documentation (labels, forms), and other options.
Select the printers you want to use with StarShip by selecting its check box in the "Enabled" column. If it is a thermal printer, check the Thermal Printer check box.
StarShip supports all printers that use EPL2 and ZPLII thermal programming language. For a list of supported printers, click here.
In this section, define settings for printing the thermal label.
Printer Model : Select a printer model or click Print Model Type to print the model information to your printer. Default selections are Eltron/Zebra model numbers EPL2 and ZPLII.
Total Label Size : Select the label size.
Move Print Down : This option moves all printing down by the specified number of inches.
Move Print Right : This option moves all printing to right by the specified number of inches.
Includes Tear-off Audit Label : StarShip can append a custom Audit Label to the bottom of the shipping label. Checking this check box indicates that the label is perforated. When checked, the Tear-Off Type and Audit Label Height fields are also enabled.
Tear-Off Type : Horizontal or Notched; When a label type is selected, Label Orientation is also enabled.
Audit Label Height : Maximum
height in inches of tear-off (disabled if "Includes Tear-off
Audit Label" is unchecked).
Select the Print check box for each label you want to print and if necessary, select a printer from the corresponding drop-down list. You also can access Printing Setup using the link at the bottom of the wizard.
Select the Print check box for each document you want to print and if necessary, select a printer from the corresponding drop-down list. You can also access Printing Setup using the link at the bottom of the wizard.
