Maintain Carriers
Maintain Carriers provides access to your parcel and freight carriers
database, where you can add user-defined carriers and configure carrier
information.
StarShip automatically loads all supported carriers based on your registration;
these carriers cannot be deleted. The carriers listed in the Maintain
Carriers window will also include those that you have added manually and
set up for Manual Processing.
User-Defined/Manual Processing Freight Carriers
You can add a carrier you use for manual processing that is not associated
with your carrier accounts.
Follow these steps to add a new carrier.
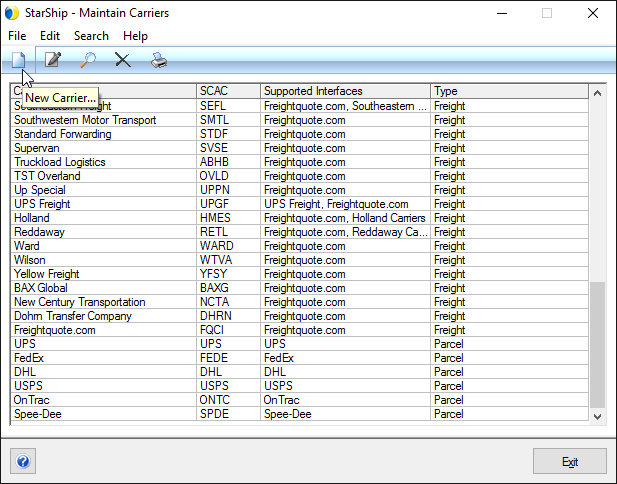
- In the StarShip Client, select Maintain
> Carriers.
- Click the New Carrier
button. You can also press Ctrl +
N or select File > New.
- Enter the following information on the Main tab
- Disable this carrier : Check this option if you
do not want StarShip to return rates for this carrier for any carrier
interface when rating shipments.
- Carrier's Name
and SCAC code : Both of these
fields are required.
- Type : Select Freight.
- Services : This section lists all services that
have been entered as being supported by this carrier. A minimum of
one service is required for all carriers. You can add, edit, or delete
services. When adding or editing a service, the dialog's required
fields are:
- Service Name: Enter the name of the service.
- Code: This is a code used to designate the
service. It must be unique for the carrier - each code can only
be used once for each carrier. If an existing code is entered,
StarShip will respond with an error message. The code can be up
to 5 alphanumeric characters.
- Type: LTL or TL.
- Phone : Type in the carrier's telephone/fax number.
- Note : You can use this field to store carrier
information.
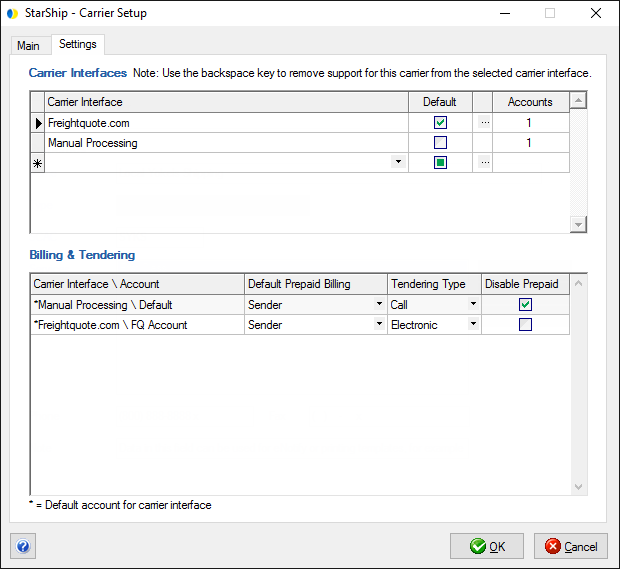
- The Settings tab allows you to set the carrier interface(s)
that will provide rates for this carrier, and configure billing and
tendering options.
- Enable Freightquote.com Rating and 3PL.
Under Carrier Interfaces, check the Default check box to set up the
default carrier interface for this carrier.
- Tip
: You can also add an account for a carrier interface by clicking
on the " ... " button. This will bring up the Add Account
dialog, where you can enter the account name and login information.
After adding the account, the carrier interface/ account combination
is added to the Billing & Tendering grid. The number of accounts
for each carrier interface are listed in the Accounts column.
Note: You can also add accounts for a
carrier interface in Setup > Carrier Interfaces.
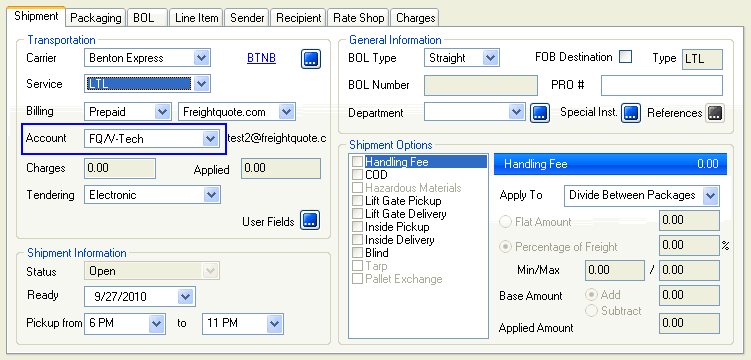
When this carrier is selected, this default account will be populated
on the Shipment tab :
For more information on defining the default account for a specific
carrier interface, see that carrier's interface setup
help.
Billing
& Tendering (Default billing type)
Select the default prepaid billing type for each carrier interface/account
combination by choosing from the drop-down list. This is the default Billing
Type for shipments that are shipped using this carrier interface/account
combination. You can select from Sender, Freightquote.com, or any other
3PL that you set up in Maintain > 3PL.
Then choose a tendering type: the choices are Call, Daily Pickup, or Electronic.
Finally, if you want to disable prepaid billing options for a carrier
interface/account, check Disable. Once disabled, you will not see rates
for this carrier when you rate a shipment, nor will this carrier appear
on the Shipment tab.
PRO Numbers
StarShip allows you to automatically generate PRO Numbers for manual
shipments. This feature can also be used when freight carriers do not
assign PRO Numbers, such as when the Tendering Type is set to Call or
Daily Pickup. Additionally, StarShip allows you to configure different
PRO Numbers settings for different Carrier Interface/Accounts for the
same carrier.
For more information, see Auto-generate Pro
Numbers.
Parcel Carriers
- In the StarShip Client, select Maintain
> Carriers.
- Click the New Carrier
button. You can also press Ctrl +
N or select File > New.

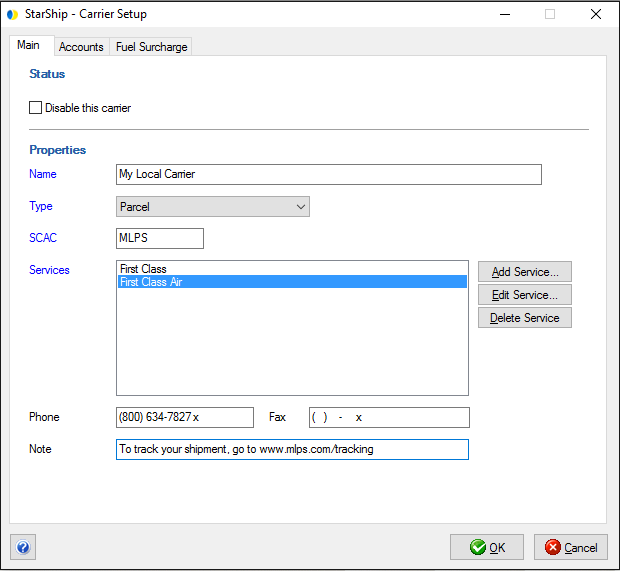
- Enter the following information to create and configure
the new carrier :
Main
- Disable this carrier : Check this option if you
do not want StarShip to return rates for this carrier for any carrier
interface when rating shipments.
- Carrier's Name
and SCAC code : Both of these
fields are required.
- Type : Select Parcel.
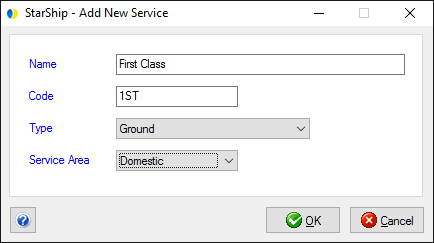
- Services : This section lists all services that
have been entered as being supported by this carrier. A minimum of
one service is required for all carriers. You can add, edit, or delete
services. When adding or editing a service, the dialog's required
fields are:
- Name: Enter the name of the service.
- Code: This is a code used to identify the service.
It must be unique for the carrier - each code can only be used
once for each carrier. If an existing code is entered, StarShip
will respond with an error message. The code can be up to 5 alphanumeric
characters.
- Type: Ground or Air
- Service Area : Domestic or International
- Phone : Type in the carrier's telephone and/or
fax number.
- Note : You can use this field to store any
notes for the carrier. For example, you can use it to provide a tracking
website for customers to track shipments.
Accounts :
This tab allows you to set up your carrier accounts.
You can have multiple accounts for each carrier but you must have at least
one account set up in order for the carrier to appear as a selection on
the Ship screen.
Click Add to add an account and fill out the tabs as described below:
Address Tab
Provide an account name and a unique account number
for the account.
Each account must also have a corresponding address.
This is the address that will be used as the origin address when rating
shipments.
Zones/Rates Tab
StarShip allows you to upload your carrier rates
and zones files to use when processing shipments for this carrier. Zones
and rates are used when processing domestic shipments only. For
International shipments, shipping charges must be entered manually. You
do not have to upload zones/rates files.
Service
Availability drop-down
All services
are available for all destinations; zone unassigned
If you don't have a zone
file to upload, you should select this option. This allows users to process
shipments for this carrier without zone or rate information. All created
services will be available for the selected carrier and the shipping charges
can be manually entered. (Other Zones/Rates settings on this dialog will
be greyed out, and any uploaded Zones data will not be used.)
Other Actions
Edit Carrier: Double-click
a carrier entry to launch the Edit Carrier dialog. You can also click
Edit Carrier on the toolbar or select Edit > Edit Carrier. Make any
changes and then click OK to save
your changes.
Delete Carrier: Click
the carrier(s) you want to delete and select Delete
Carrier from the toolbar. You can also select Edit > Delete
Carrier or press Ctrl + D.
Confirm that you want to delete the carrier(s) by clicking Yes.
Search: To find
a carrier, click Search on the
toolbar. You can also select Search > Find Carrier or use the keyboard
shortcut Ctrl + F.
Basic Search : : Advanced Search
Print


