Click the column headings to change
the criteria by which the list is sorted as well as the sort order (ascending/descending).
Click the column headings to change
the criteria by which the list is sorted as well as the sort order (ascending/descending).
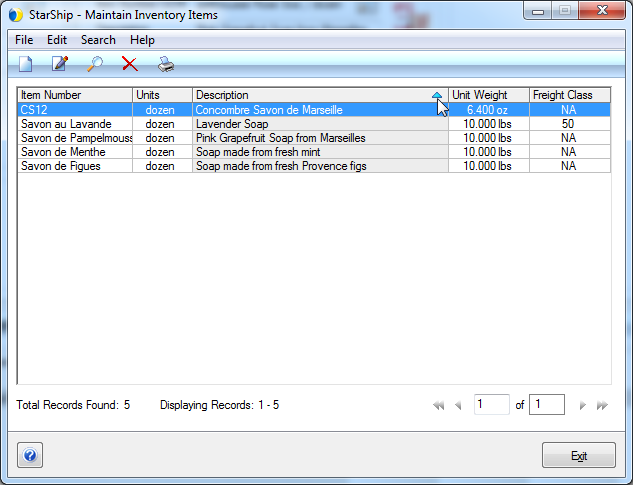
Maintain Inventory Items gives you access to your inventory database, where you can define item, hazardous, and International detail.
The Maintain Inventory Items window launches when you select Maintain > Inventory, and displays a list of the current inventory items.
Click the column headings to change
the criteria by which the list is sorted as well as the sort order (ascending/descending).
On the Maintain Inventory dialog, click New
Inventory Item on the toolbar. You can also select File
> New Inventory Item or use the keyboard shortcut Ctrl + N.
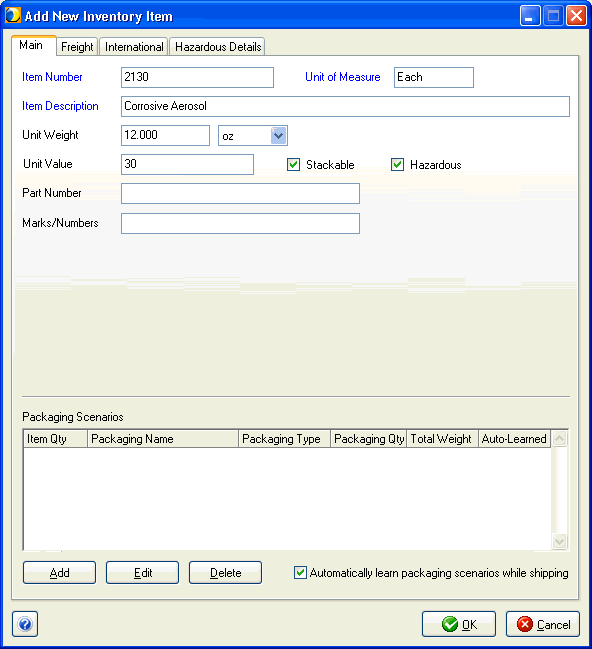
This launches the Add New Inventory Item dialog box. Use the Inventory
Information below to fill out the fields for the new item.
Double-click an inventory item to launch the Edit Inventory Item dialog. The Item Number displays in the title bar. Make any changes and then click OK to save your changes. Refer to the Inventory Information below for field descriptions.
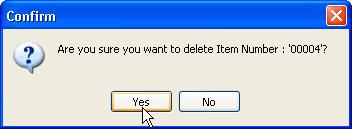
Click the inventory item(s) you want to delete and select Delete
Inventory Item from the toolbar. You can also select Edit >
Delete Inventory Item or press Ctrl + D.
Confirm that you would like to delete the item by clicking Yes.
To perform a search for inventory items, click Search on the toolbar. You can also select Search > Find Inventory Item or use the keyboard shortcut Ctrl + F.
See also :
The information you enter here will populate line item shipment fields on the Ship screen when this item is being shipped.
Field |
Notes |
Item Number |
This is a required field. Items that have the same item number must have a different unit of measure. |
Unit of Measure |
This is a required field. The default value is "Each". Item numbers for different inventory items can be the same, but you must define a different unit of measure for these inventory items |
Item Description |
This is a required field. Enter a description for the item. |
Unit Weight |
0.000 format; weight of each "unit of measure" of this item. Example: if you selected "Each" as the unit of measure, enter the weight of each item. When you ship against items from an order or other source interface document, the weight data from the source interface is imported and saved for each item in Maintain > Inventory. You may change this weight on the Line Item tab, and if so, the new weight is saved to the Inventory Item. However, the next time that item is imported from an order, etc, the source interface weight will overwrite the StarShip database weight for the item. The only exception is when the item does not have weight data defined in the source interface. In that case, StarShip weight data is always used. |
Unit Value |
0.000000 format: value of each "unit of measure" of this item. Example: if you selected "Each" as the unit of measure, enter the value of each item. |
Part Number |
Enter the item's part number. |
Marks/Numbers |
Enter any marks or numbers associated with the item. |
UPC |
Enter the Universal Product Code Number. |
GTIN |
Enter the Global Trade Item Number. The GTIN is a globally unique 14-digit number used to identify trade items, products, or services. |
Stackable |
Check this option if the item is stackable. |
Hazardous |
Check this option if the item is hazardous. The Hazardous Details tab will be enabled, where you can link a Hazardous Materials Profile or create a custom profile for the item. |
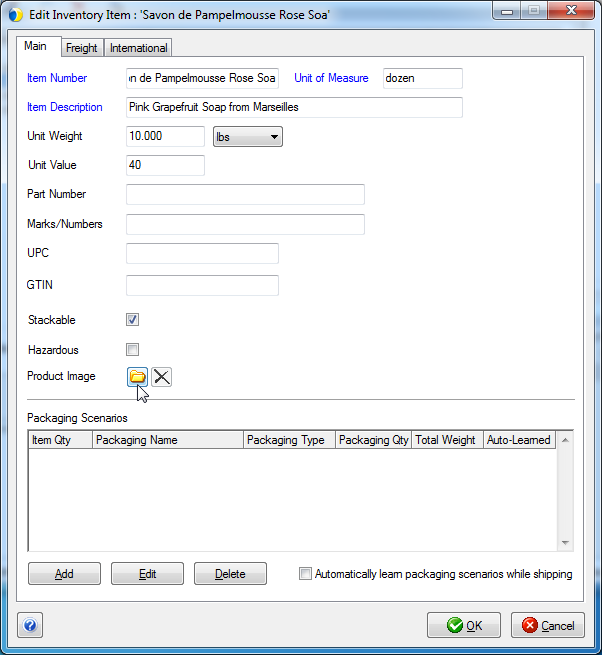
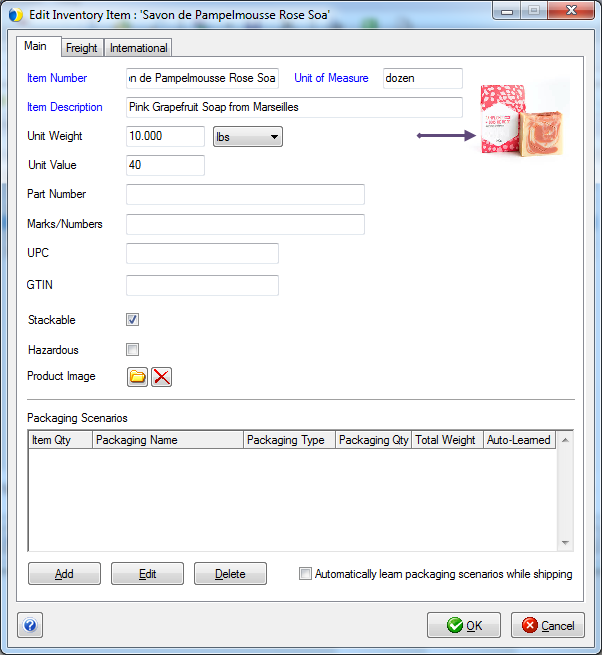
Product Image |
You can add an image up to 1MB in size for the inventory item that will display in Maintain Inventory and also on the Line Item tab. See Product Images for more information. |
StarShip allows you to store one image per inventory item. The file must be in a standard image format and not more than 1MB in size : BMP, GIF, JPG or PNG.
Add a Product Image
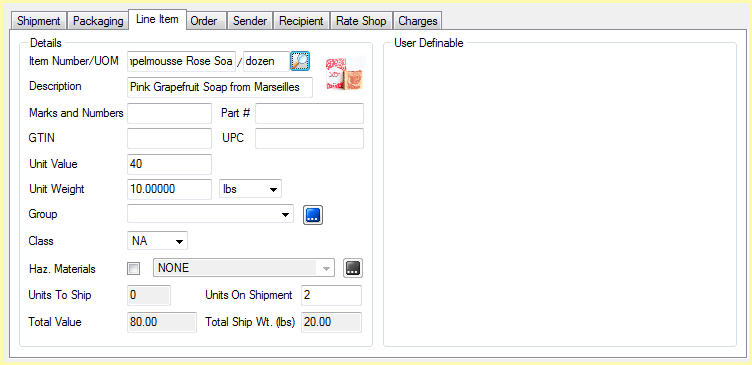
Where do product images display?
Product images display when the item is selected on
the Line Item tab.
Document Templates
You can add the Product Image field to document templates, such as packing lists, to display the product image within the document when printed.
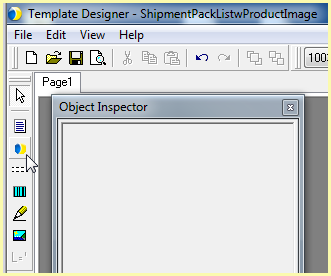
To add a product image to a template :
Go to Setup > Printing > Manage Templates and select or create the template.
In the Template Designer, select
the StarShip Data tool on the left and position the field where you
want the image to appear :
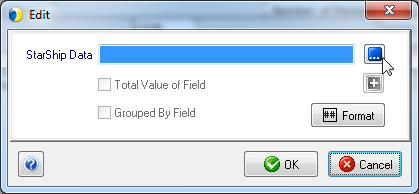
Click the  button next to the
StarShip Data field.
button next to the
StarShip Data field.
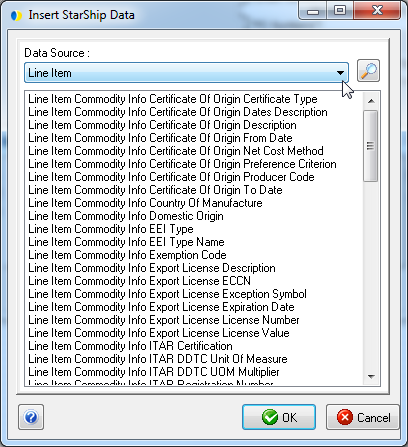
Select Line Item as the Data
Source.
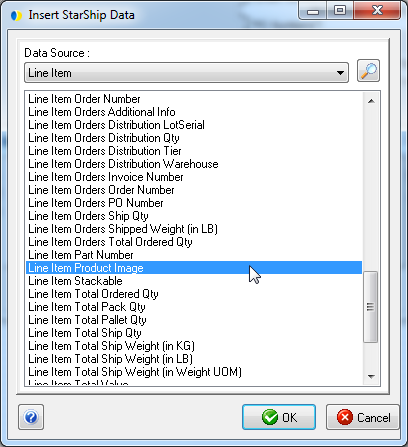
Select the Line Item Product
Image field and click OK. Click OK again to exit back to the template.
eNotify Templates
You can add the Product Image field to eNotify templates as well. (Coming soon)
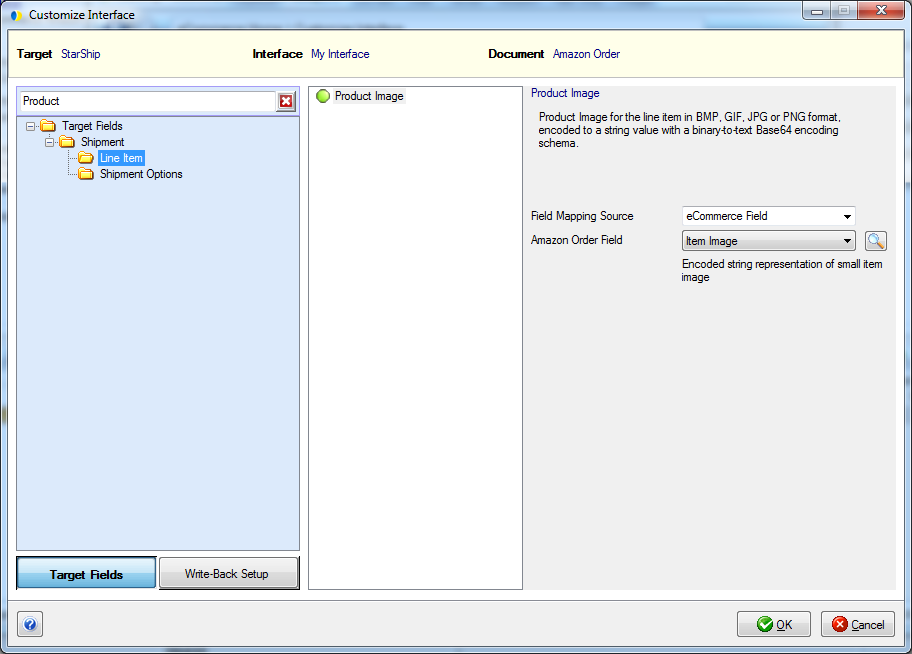
Field Mapping
The Product Image field can be mapped to the Source
interface in Customize Interface. Currently, this is mapped by default
for the Amazon eCommerce source interface to the Amazon Item Image Order
field.
Note for SQL Interface, SQL Extension, and Developer Interface Users
In order to use the Product Image feature, the image must be sent to StarShip as a base64 encoded string.
Packaging Scenarios allow you to specify and automate how items are packed into packages and pallets. StarShip can also "learn" how you pack items into packages and/or pallets as you enter information and save shipments on the Ship screen. StarShip then uses those scenarios the next time you ship the item.
Note : When using packaging scenarios, the packaging is calculated when the shipment is imported and is not recalculated if/when the quantity is changed. If quantities need to be changed when packaging scenarios are being used, shippers should use the Shipping Assistant to first adjust the quantities. Packaging scenarios will then be adjusted based on changes to the line item quantity.
Manually enter a package scenario
Follow this procedure to enter a packaging scenario for an inventory item.
Select Maintain > Inventory.
Select to edit an existing item or add an item.
Under Packaging Scenarios, click Add.
Enter the following information:
Item Quantity: Number of inventory items;
Packaging: Name of the packaging (Big Box, Small Box, Pallet, New Crate, Medium Barrel, etc.); Dimensions: Length, Width, and Height as defined in the Packaging is simply for the packaging, i.e. a ”Big Box” is 20” x 20” x 20”. Packaging/handling unit weight is also listed, i.e. a Big Box has a weight of 1.25 lbs.
Packaging Qty: Number of packages or pallets into which item quantities should be packed; Note that when you enter the packaging quantity and press Tab to get to the next field, StarShip will attempt to calculate the Total Weight field for you.
Total Weight: Weight of total package quantity; that is, the weight is of the Items and Packaging combined. So you would say that 20 items in 2 Big Boxes is 10 lbs. + 2.50 lbs = 12.50 lbs. You must enter the packaging weight: if the weight is not correct the shipment might get audited by the carrier and that takes extra time for additional fees. As mentioned for the Packaging Qty field, StarShip will calculate this value for you. You can also manually edit this field.
Click
OK. A dialog box will appear, asking if the value it calculated for
the Total Weight field is correct. If this value is correct, click
OK. If not, click No and you can return to the previous dialog to
change the Total Weight field.
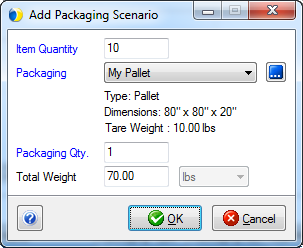
Once you have accepted or adjusted the Total Weight field, StarShip will not recalculate the Total Weight field if you edit the packaging scenario. Automatic calculation of the Total Weight field only occurs as you enter a new packaging scenario.
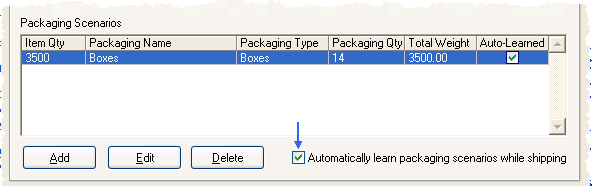
StarShip will automatically learn your packaging scenarios when you save a shipment. These auto-learned scenarios will appear in Maintain > Inventory for the item, under Packaging Scenarios, and are designated by a check mark in the "Auto-Learned" column.
Notes about the Auto-learn feature :
StarShip will only automatically learn packaging scenarios after you save a shipment.
StarShip can only learn a packaging scenario when you have one type of item in one package or on one pallet.
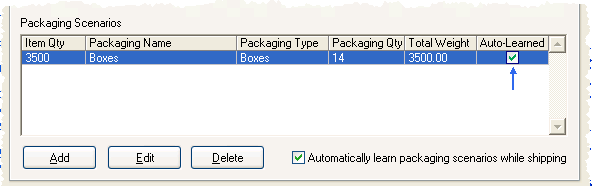
In order for StarShip to automatically learn your packaging scenarios, you must have the "Automatically learn packaging scenarios while shipping" check box enabled for inventory items.
StarShip can also automatically pack your items based on saved packaging scenarios. Enable this feature by selecting "Automatically Pack Items based on packaging scenarios" in Setup > Preferences > Freight > Packing Preferences or Setup > Preferences > Parcel > Packing Preferences.
Example: Let's say you have autolearn and autopack enabled. You then save a shipment of 100 widgets that are packed into 4 large boxes. From this point on, when StarShip sees that you are shipping 1000 widgets, it will automatically pack them into 40 large boxes.
This information will populate shipment fields when shipping this item with a freight carrier (in StarShip Freight mode).
Field |
Notes |
Group |
Select a group. When you make a selection, any NMFC information associated with the group is automatically populated on the inventory dialog box. You can access Maintain Groups to add or edit groups by clicking
the See also : Maintain Groups |
NMFC Code and Sub Code
|
Enter or select NMFC codes. If you enter new NMFC information for an inventory item, the NMFC data will be saved to your NMFC database in Maintain NMFC. See also : Maintain NMFC |
Freight Class |
Select a freight class from the drop-down list. |
NMFC Description |
Type in the NMFC description for this item. |
![]()
This information will populate the International tab for the inventory item when shipping this item internationally.
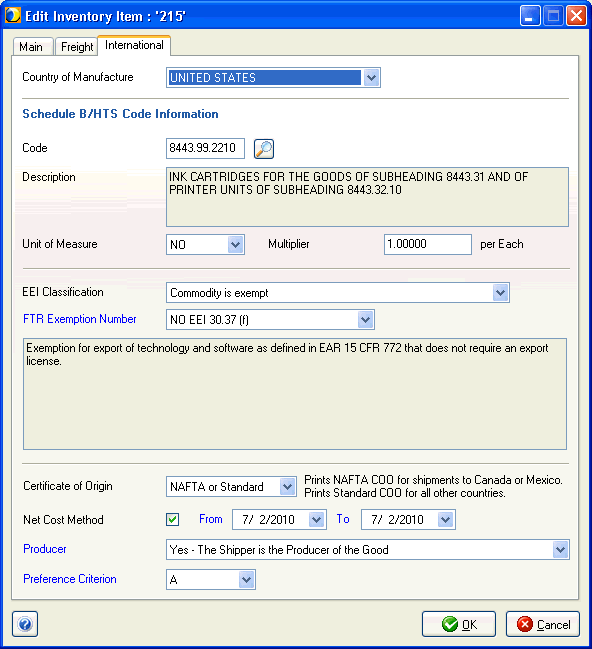
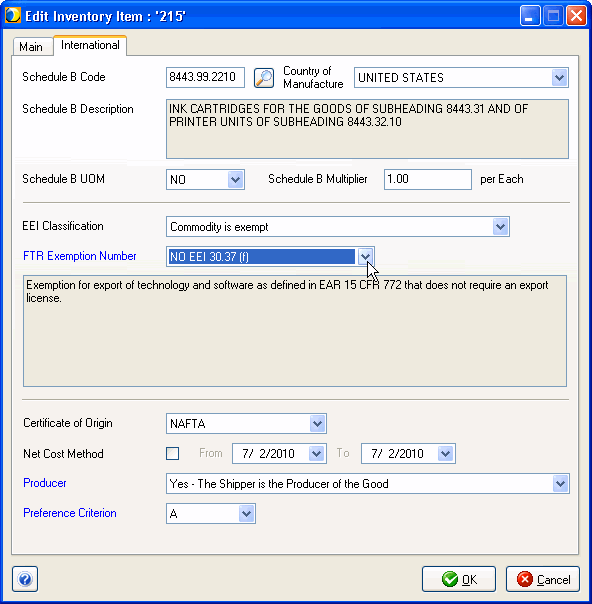
The Harmonized Tariff System (HTS) assigns a number to each product that is traded internationally to insure that customs officers and statisticians around the world are referring to the same thing when classifying a product. Each country can assign on its own four additional numbers, making the entire number 10 digits. The United States does this with its Schedule B system, which is used to describe exports from the U.S.
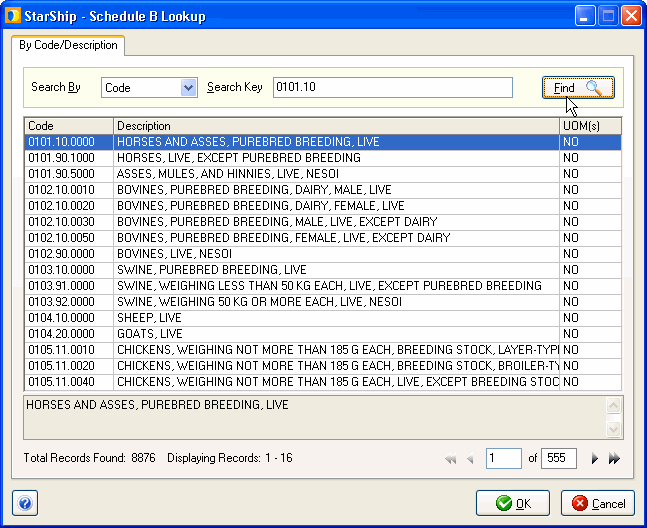
Type in the 10-digit Schedule B Export Code, or click the magnifier icon next to the field to choose from the Schedule B Codes table. The description is populated from the code description.
The Schedule B information will be saved for the shipment and for the inventory item. The following time you ship this inventory item, the code will be filled in. The Schedule B information appears on the Line Item tab when you are in Line Item view, under International Data.
More about Schedule B Code Lookup
Field |
Notes |
Country of Manufacture |
Select the country where this item is manufactured from the drop-down list. |
Schedule B UOM |
If the Schedule B code has more than one unit of measure, select the unit of measure to use for this item. |
Schedule B Multiplier |
Specify a multiplier to convert the Inventory UOM to the Commodity UOM. |
EEI Classification |
Electronic Export Information (formerly known as the SED), classification type; if this inventory item requires EEI data to be submitted, enter the EEI information. More information about EEI Classification settings follows this table. |
Certificate of Origin |
Some destinations require a Certificate of Origin (CO) for certain commodities. The commodity being exported and its destination determine if the CO is required. If the CO is required for this item, enter the Certificate of Origin information. More information about Certificate of Origins settings below. |
Commodity is exempt
No EEI is required because all commodities are exempt. When selected,
choose the FTR Exemption ID Number from the drop-down list. A description
of the exemption is shown below it.
Commodity is subject to Export License (includes License Exception)
When checked, select the Exception or Type from the drop-down list. Depending upon the selection you make, enter the appropriate information into the following fields:
License Exception or Type: A license exception is a specific grant of authority by the government to exporters for certain categories of products that would otherwise require an export license. Select an entry from the drop-down list.
License Number: Enter the Commerce Export License Number.
Expiration Date: This is the date on which the validated license number expires.
ECCN: Enter the applicable
Export Control Classification Number.
Commodity is subject to ITAR
An exemption in the International Traffic in Arms Regulations (ITAR) (CFR 120-130) serves as the written authorization from the Directorate of Defense Trade Controls (DDTC) to permit the export. Therefore, it is unnecessary to have any additional license or other written approval from DDTC. When selected, fill out the following fields:
DDTC Exemption #: Exemption number that exempts the shipment from the requirement for a license or other written authorization from the DDTC.
Registration Number: Registration Number - also called Registrant Code - is assigned by DDTC. Before applying for licenses or using an exemption, exporters must first register with DDTC. Examples of registration numbers:
M-1234 or M12345 where M = Manufacturer/Exporter
F-1234 or F12345 where F = Foreign Government official inside the U.S.
G-1234 or G12345 where G = U.S. Government Agency or employee acting in an official capacity
B-1234 or B12345 where B = One-time registration exceptions assigned only to individuals who are not in the business of import/export
DDTC United States Munitions List (USML) Category Code: USML Category Code is a means of identifying your export shipment; Acceptable Values 01-17 and 20-21.
DDTC Unit of Measure and Multiplier: Select the unit of measure for the article being shipped as stated on the license or other export authorization. This information should be provided on the license, unless the unit of measure is the commodity itself (i.e. 4 T-55 engines, 11 centerfire rifles). In those cases, simply use an appropriate Unit of Measure code ("Items", "Pieces", etc.). The multiplier is the number of units that correspond to the DDTC measure reported for this commodity.
DDTC Significant Military Equipment Indicator: An indication that some or all of the articles to be exported warrant special export controls because of their capacity for substantial military utility or capability.
DDTC Eligible Party Certification Indicator: A self-certification
by the DDTC registered exporter that they can meet all the ITAR criteria
to use the exemption and a certification by the DDTC registered exporter
that all parties to the transaction are eligible to receive USML items
under the ITAR.
N/A
EEI information is not available for or does not apply to this item.
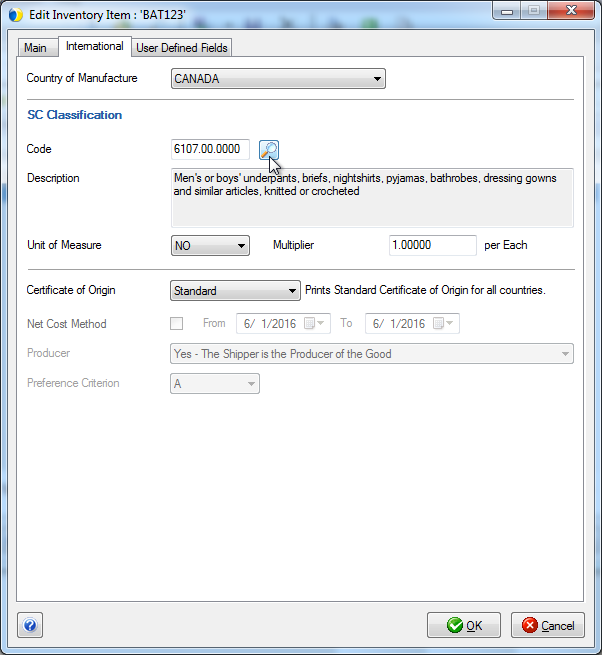
The Canadian Export Classification system is based on the International Harmonized Commodity Coding and Description System (HS). Canadian exporters or their agents, are required to assign an Export HS Number on all export transactions. The Canadian Export HS Number is based on the international six digit “root” with an additional 2 digits added for Canadian domestic purposes.
Type in the SC Classification Code, or click the magnifier icon next to the field to choose from the complete list of codes. The description is populated from the code description.
The SC Classification information will be saved for the shipment and
for the inventory item. The following time you ship this inventory item,
the code will be filled in. The SC Classification information appears
on the Line Item tab when you are in Line Item view, under International
Data.
Some destinations require a Certificate of Origin (CO) for certain commodities. The purpose of the CO is to authenticate the country of origin of the merchandise being shipped.
The CO verifies the country in which the goods were manufactured. The commodity being exported and its destination determine if the CO is required. Some nations restrict imports from certain countries; many countries limit the quantity of goods that are allowed to be imported, or give preference to goods manufactured in the U.S.
Note : For UPS Canada Origin : If
the shipment contains both NAFTA and Standard items, you cannot print
the US Certificate of Origin or NAFTA Certificate of Origin; you will
be prompted to use the StarShip forms instead.
NAFTA, Standard, or Not Required : Use the NAFTA CO for destinations to Canada and Mexico if the goods qualify as North American Origin goods.
If you selected NAFTA, enter the NAFTA Information:
Net Cost Method: This method calculates the regional value content as a percentage of the net cost to produce the good. Net cost represents all of the costs incurred by the producer minus expenses for sales promotion (including marketing and after-sales service), royalties, shipping and packing costs and non-allowable interest costs. Check the check box to select it.
From/To: A Certificate of Origin may cover goods imported over not more than a twelve-month period.
Producer: Select the producer type for this good.
Preference Criterion: There are six preference criteria, A through F. Refer to Article 401 of the NAFTA and Annex 401.
See also : International tab, International Preferences Settings, International Shipments
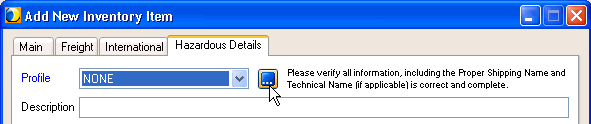
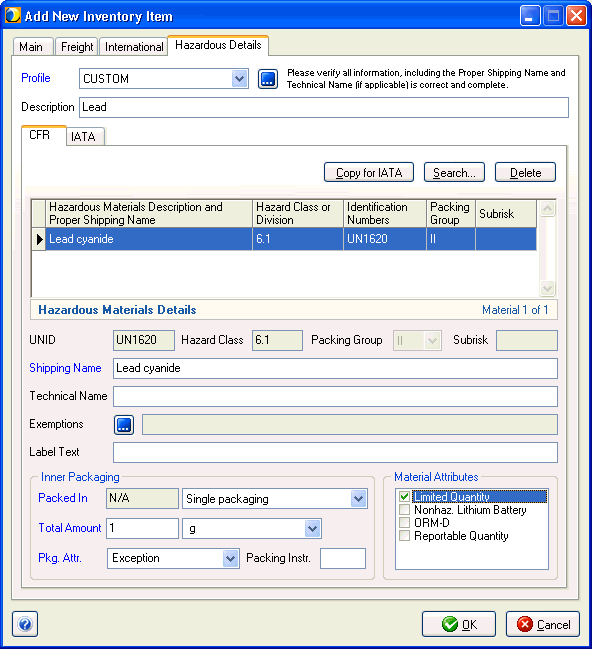
The Hazardous Detail tab becomes available when you check the Hazardous check box on the Main tab. You can assign or create Hazardous Materials Profiles to associate with inventory items, or add up to 3 hazardous materials to the CFR/IATA tabs.
On this tab, you can assign a Hazardous Materials Profile to an inventory item. It can be a profile you already set up, in which case you select it from the drop-down list to populate this tab. The selected profile will be linked to this inventory item and will populate shipment fields when shipping the item.
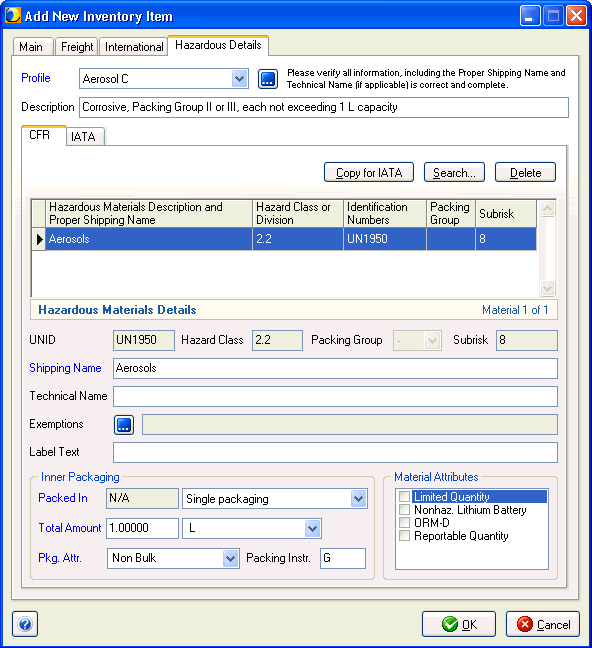
To create or modify a profile to add here, click the ellipsis button next to the Profile field to access Maintain Hazardous Materials Profiles.
You can also add hazardous materials on this tab to create a "CUSTOM" profile for the inventory item. To search for a hazardous material to add to a profile, click the Search button. You can search by Shipping Name or the UNID. Enter the search term and press Search. Then, select from the Search results and press OK to add the material to the profile.
Use the Copy for IATA button to populate the IATA tab. The information is duplicated on both tabs.
For more information about fields and setting up profiles, see Hazardous
Materials Profiles.
See also : Hazardous
Materials Preferences Settings