StarShip only supports 203 DPI printers; printers that are 300 DPI are unsupported. StarShip may work with 203 DPI printers that use EPL2 or ZPL II thermal programming language. The following printers have been tested and certified to work with StarShip and are recommended.
Note
ZPLII printers are preferred for cross-carrier printing consistency. Some carrier labels, such as USPS, require printers that support ZPLII.
Printer |
Models |
Language |
Zebra/Eltron |
Zebra LP 2844 Zebra TLP 2844 Eltron Orion Eltron LP 2742 Zebra 2443 Zebra 2746e Eltron LP2443 Eltron LP2543 |
EPL2 |
Zebra |
GX 420t GX 420d Zebra ZP 500 Zebra ZP 500+ Zebra CTP 450 Zebra S4M Zebra Z4M Zebra Z4M+ Zebra Z4000 Zebra 2844-Z |
ZPL II |
FedEx |
ZP500 |
ZPL II |
Pitney Bowes |
Zebra |
ZPL II |
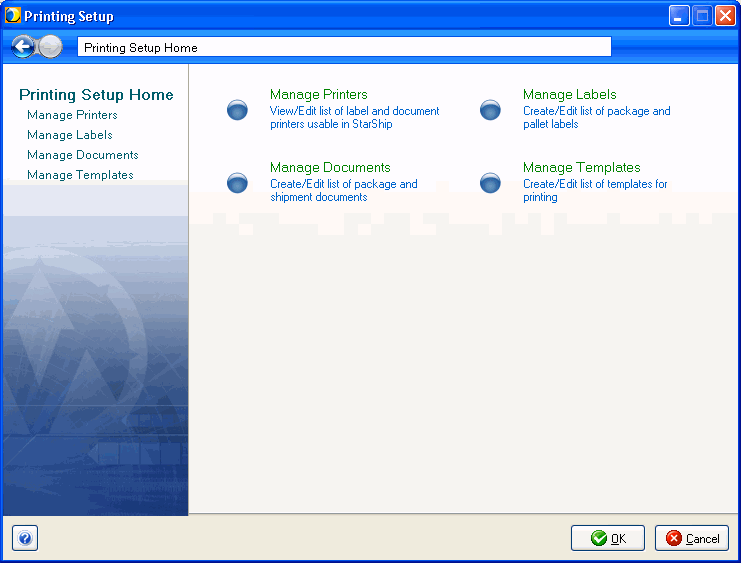
The Printing Setup dialog, accessible from Setup > Printing, defines printers, shipment documentation (labels, forms), and other options. Required fields are indicated by a blue field heading. Labels and documents must be enabled in order to print them.
Manage Printers allows you to add and configure printers used to print forms and labels. It is accessible from Setup > Printing.
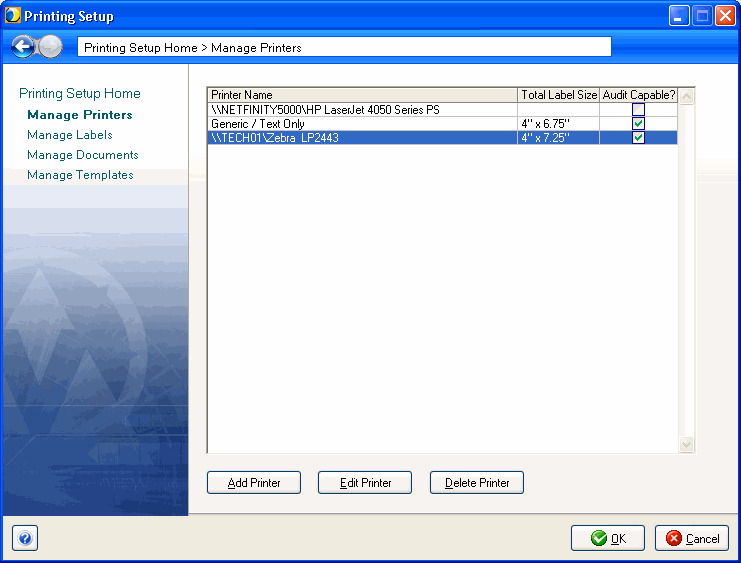
Click Add or Edit to configure printers based on the field descriptions below. Required fields are indicated by a blue field heading. If adding a laser printer, no additional configurations need to be made.

Printer Name
This drop-down list shows available printers. You can only add printers that have already been added through Microsoft Windows. If you add a printer in Windows while StarShip is open, you must exit and relaunch the StarShip client in order for that printer to appear in the Printer Name list.
Thermal Label Printer
Check this box if the printer is a thermal printer. When checked the following fields will be enabled: Printer Model, Total Label Size, Move Print Down, Move Print Right, and Includes Tear-off Audit Label. The Print Model Type button will also be enabled.
Printer Model
If you don't know the printer model, click the Print Model Type button to print the model information to your printer. Select a printer model. Default selections are Eltron/Zebra model numbers EPL2 and ZPLII.
Total Label Size
Select the label size. If you are using tear-off audit labels, the label cannot be smaller than 4 x 6.75.
Move Print Down
This option moves all printing down by the specified number of inches.
Move Print Right
This option moves all printing to right by the specified number of inches.
Includes Tear-off Audit Label
StarShip can append a custom Audit Label to the bottom of the parcel shipping label. Checking this check box indicates that the label is perforated. When checked, the Tear-Off Type and Audit Label Height fields, and Orientation button, are also enabled.
Tear-Off Type
Horizontal or Notched; Notched label types are used with FedEx.
When Tear-Off type is changed, the change will be reflected in the Orientation picture.
Audit Label Height
Maximum height in inches of tear-off (disabled if "Includes Tear-off Audit Label" is unchecked).
Label Orientation
This image shows the tear-off in relation to the direction in which the label is emitted from the printer. Click the Orientation button to change the orientation of the label to reflect the manner in which the label comes out of the printer. The arrow indicates the direction that the label feeds. Orientation determines the direction in which the notch will come out from the printer.
For thermal labels that don't include audit labels, orientation is set in Manage > Labels.
Documents and Labels
The list shows existing documents and labels. Check the box next to each document/label for which this printer should be used. Grayed out entries may not be selected for this printer.
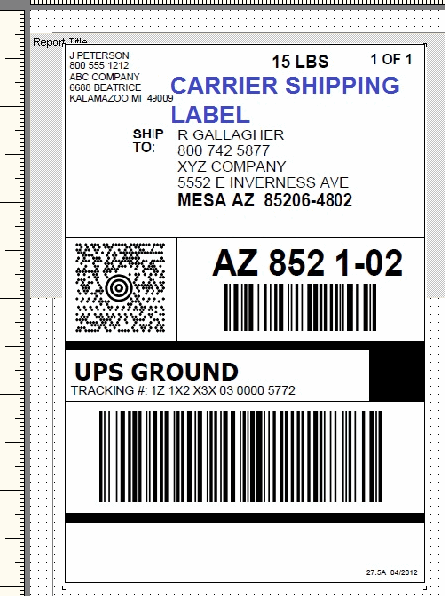
StarShip currently supports carrier-specific parcel labels, package and pallet thermal printer labels (with or without bar-codes), BOL, and laser printer labels. Sample label images are provided for reference when you click on a label type. To create new labels or modify a default label, see Manage Templates.
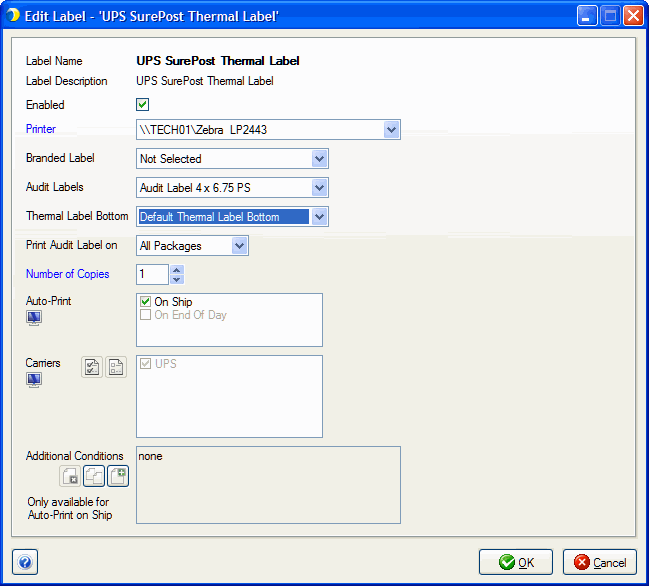
Select a label from the tree view and click Label Settings to enable/disable the label, select the printer, and define the carriers for which the selected label should print.
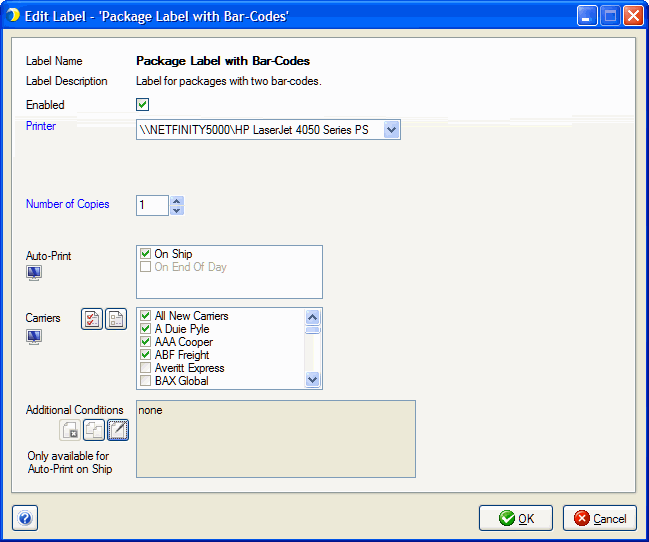
Enabled
Check this box to activate this label, and then select a Printer from the field below it.
Number of Copies
This field defaults to 1. You can change the number of copies printed by clicking the up/down arrows next to the field.
Check "On Ship" if you want StarShip to print the label automatically when you Ship/Process a shipment. Check "On End of Day" to print labels automatically during End of Day Close.
Carriers
If available, select the carriers for which you want to print this label. You may click the Select All button, the Clear All button, or check the check box next to each carrier you want to include.
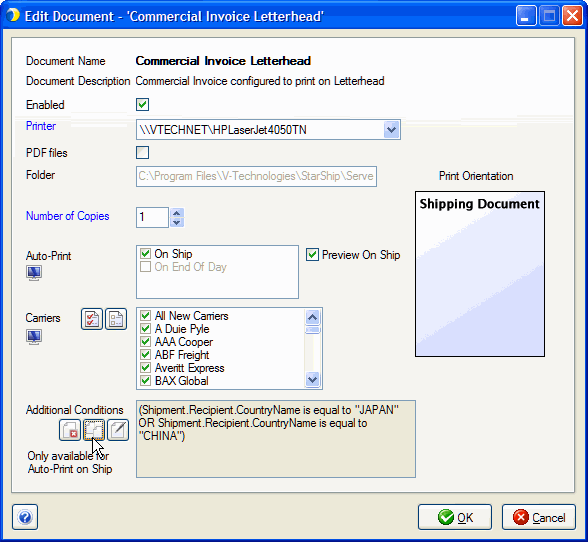
Additional Conditions
This section allows you to set up printing parameters
for the label when Auto-Print "On Ship" is selected. To add
a condition, click the Edit Conditions button to launch the Condition
Builder. For more information, see Define
Conditions.
If Includes
Tear-Off Audit Label was selected in Manage Printers, the Manage Labels
dialog will display additional audit label fields.
Manage Documents allows you to manage settings for shipping documents. StarShip has default documents available for you to use. To create new documents, see Manage Templates.
Select a document from the tree view and click Document Settings to modify settings for or enable/disable the document. For more information, see Document Settings.
Types of the BOL appear in the list and sample BOL images are provided for reference when you click on a BOL type. In Document Settings, you can choose to print the BOL upon Ship/Process and additionally enable a Print Preview on Ship/Process.
These include all other shipping documents and reports, such as the Shipping Manifest (for Carrier), Commercial Invoice, and Shipping Report (by date); some display sample images when you click on them.
Define Conditions
Conditions are a number of field values or calculations (operands) connected by operators. They can be based on :
Constant Values : These are fixed values that you define. You can add a Constant Value by selecting New Constant Value from the drop-down list. Values you already created are also saved to the drop-down list.
StarShip Fields : These are fields from the Ship screen. Available fields may change depending upon the type of label or document for which you are setting conditions.
Notes
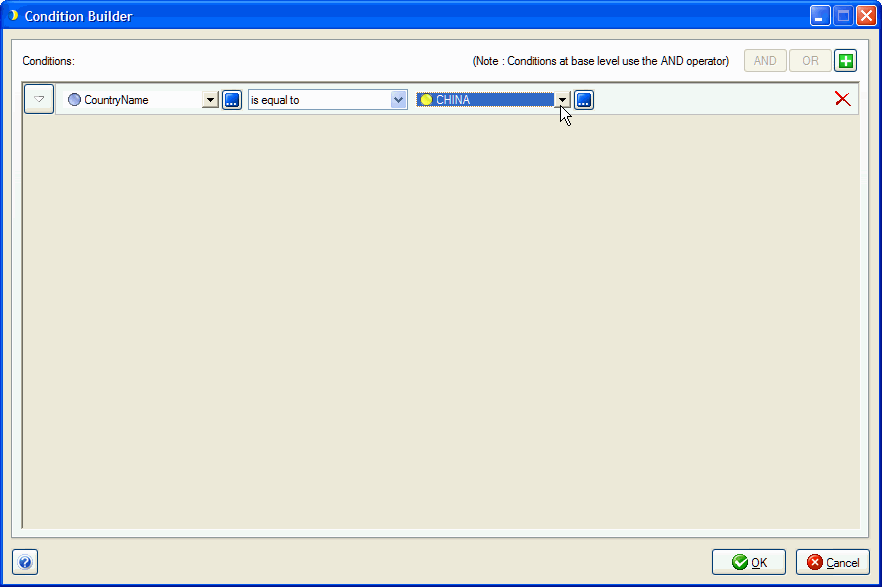
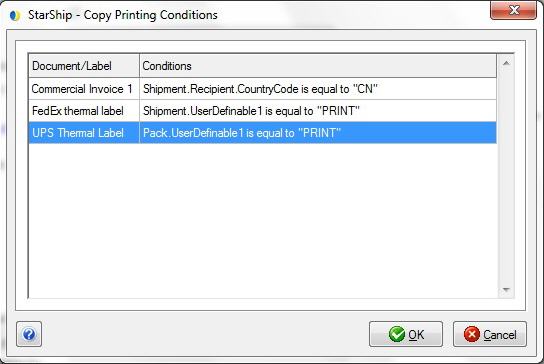
In this example, we will create a condition that prints the Commercial Invoice document if the recipient address is in a specific country.

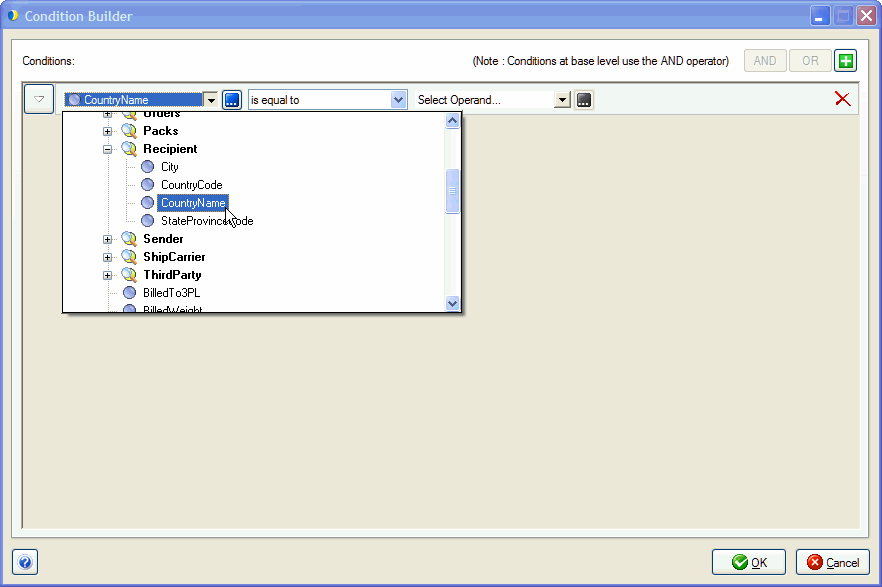
Continue to use the fields in the row to select an
operator and second operand. The second operand can also be a constant
value, which you can add from the drop-down list.
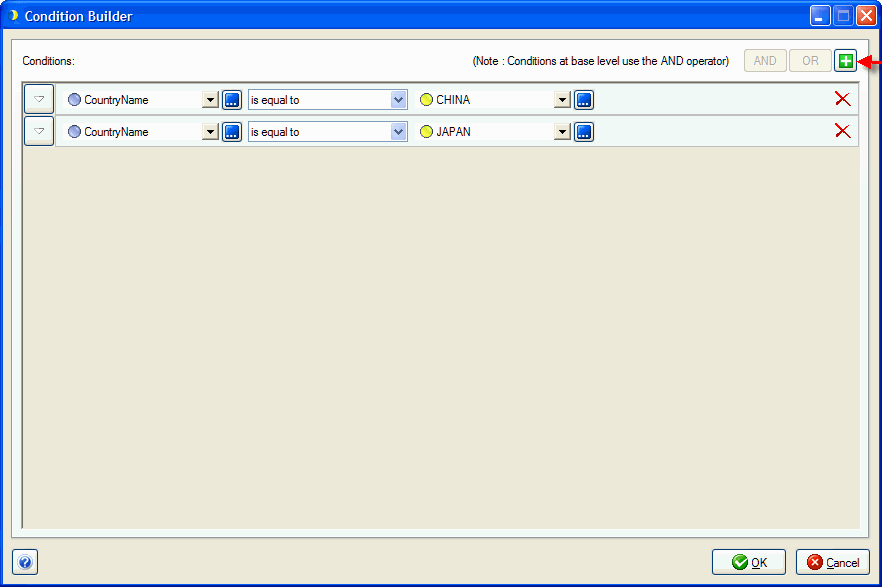
Multiple conditions
: To add another condition, click the ![]() button in
the upper right corner of the dialog. To group conditions, first select
the conditions you want to group...
button in
the upper right corner of the dialog. To group conditions, first select
the conditions you want to group...
...and then select the AND or OR button. Grouped
conditions can be administered by clicking on the AND or OR button in front of the condition. Note : If you define
more than one condition and do not specify the AND/OR operator, AND
is used by default.
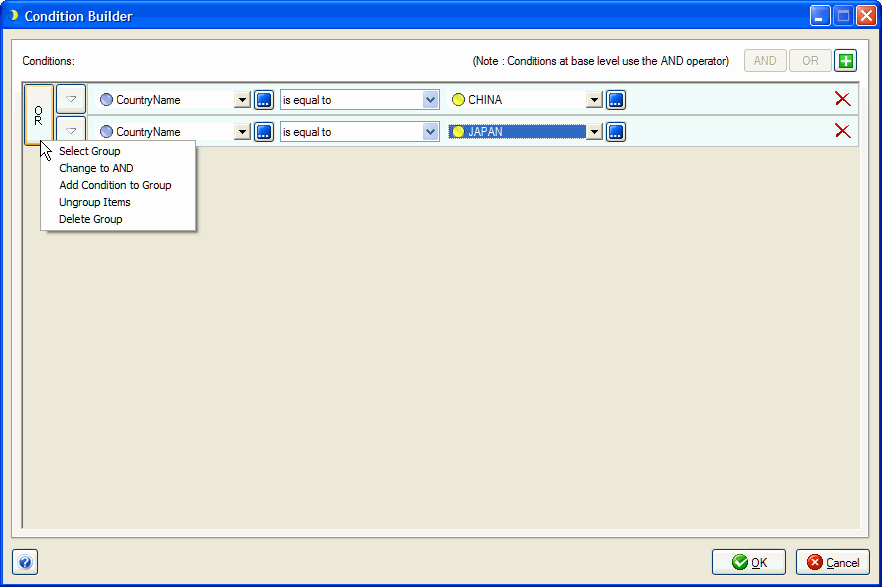
When you click OK, the expanded condition(s)
are shown on the dialog.

Copying Conditions
Manage Templates allows you to customize labels and templates using a template designer interface. You can copy and modify any of the default forms provided with StarShip to create custom templates, or create new ones.
Templates and labels are organized into groups. Shaded rows denote the group names. When you click the " + " sign next to a group name, the group expands to show the templates it contains.
To display only the templates for a specific group, select the group from Show Group drop-down list:
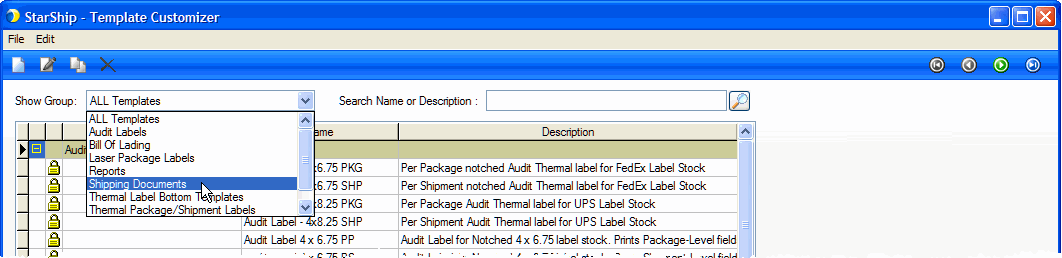
To search for a specific template, type your keywords into the Search Name or Description text box and click the magnifier icon. The row selector will jump to the first closest match.

Templates marked with a padlock icon are read-only and are provided as default templates that you can copy and modify to suit your needs using the template designer.
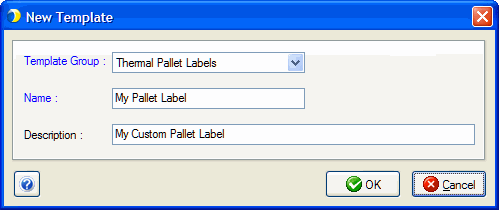
You can create a completely new template If you don't want to base your template on one of the default templates. From the Manage Templates window, select File > New. Select a Template Group from the drop-down list. Enter a name for the template in the Name field and a description (optional). Note that the options available on this dialog depend upon the type of Template Group selected.
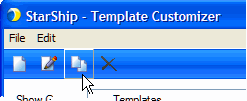
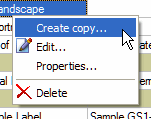
Use the Copy button on the toolbar to copy (Save as...) and edit an existing template. Select the template and click Copy.
You can also right-click on any template in the grid to open a pop-up menu. Default (padlocked) templates can be copied and edited, while templates that you create may also be renamed or deleted.
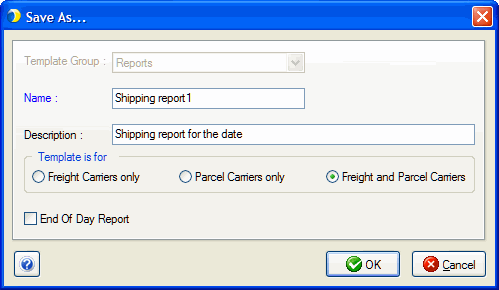
In the Save As... dialog, enter a name for the new template and edit the description (if desired).
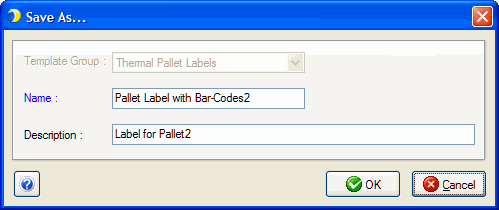
Modified default templates must be saved under a different name. You can do this by selecting the template and clicking the Copy button. Type a name for the template in the Name field. You may also type a description. In the "Template is for" section, select whether this template should be used for Freight Carriers, Parcel Carriers, or both.
To modify a template, launch the template designer by double-clicking the template. You may also select the template and either use the Edit menu, the Edit tool in the toolbar, or press Ctrl + E.
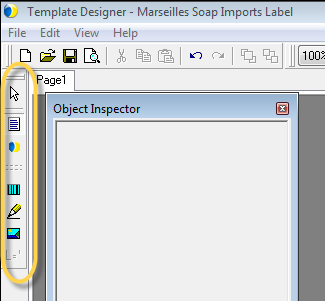
Across the top of the template designer window (and also available from the menus) are a set of standard word-processing editing tools, which you can use to modify the template text and format. Hover over a tool to see its description.
Another useful tool is the Object Inspector, enabled from the View menu. The Object Inspector gives you exact coordinates for the selected field and allows you to precisely change its positioning (in pixels), size, text or field name.
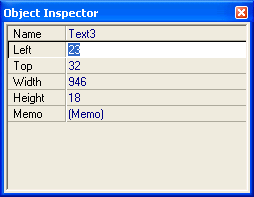
To select a field, click on it. A selected field will be surrounded by "handles". You can then use the Object Inspector or other tools to modify it. Drag the handles to resize it or click and drag the field to move it. When an object is selected, press the Ctrl + Cursor keys to nudge it one pixel at a time.
To edit the text inside a field, you can simply double-click it and type into the Edit text box.
On the left side of the Template Designer window, you will see a palette of tools that allow you insert objects into your templates.
After clicking the tool for the type of object you want to insert, single-click the cross-hairs on the desired location to place the field.
You can also insert some items by right-clicking on the template workspace
while the Select Object tool  is active.
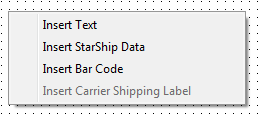
Text Object ![]()
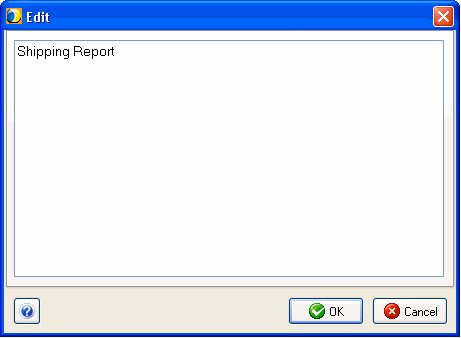
After placing the text box, type the text into the Edit
dialog. Click OK. Once you've placed the text box, you can click and drag
it to change its location.
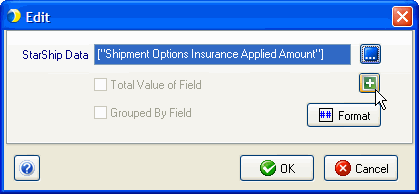
StarShip Data ![]()
Once you've placed the data box, click the ![]() button next to the StarShip data field and choose the type of field
from the Data Source drop-down list.
button next to the StarShip data field and choose the type of field
from the Data Source drop-down list.
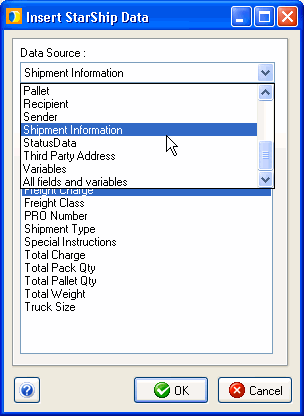
Choose the field you want to include on the form and press OK. The selections
available when you press the Format button are contingent upon the type
of data used for the field you selected.
For text data, specify the position of the characters you want to include;
for example, to include the first seven characters, the setting would
be Print Starting at 0 to 7.
Numeric data can have two specific types:
Enumeration data is a type that consists
of fields that have a list of values or a True/False value. You may also
choose to print specific text based on the field value. This is useful
if you want to place an "X" mark in a specific box, for example,
to denote a line item as a hazardous material on a form.
Band ![]()
You can use bands to delineate specific areas on a form.
A detail band is one that will repeat for each occurrence of the item
contained on the band. For instance, the Commercial Invoice will print
a row for each line item in the shipment. Bands are optional, but if you
decide to use one, then all items on a form must be placed in bands. Additionally,
bands may move closer together after you close and reopen a form in order
to conserve space.
After placing the band, choose the section type...
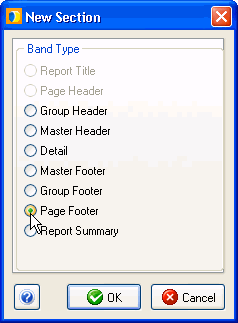
...and click OK. The band is placed on the form.
The Detail band type provides you with additional settings. Select how
many rows to print on the first page. If more than the maximum number
of records are included in the shipment, all records (rows) will be printed
on the supplemental page. The Band Settings window also displays
any text objects that are contained in the band so you can select what
to print if a supplemental page is used.
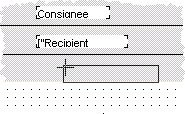
Once the band is placed on the form, you can move or add text and/or StarShip
Data objects to the band. When working with the Detail band, if the StarShip
line item object is not on the band, it will not be replicated for each
line item. Instead, you will only see the first line item for the shipment.
Tip: When moving a band that contains objects, click on the band itself so that its handles are shown. Then, click the band and drag it to move the band with its objects.
Band Types
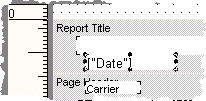
Report Title : Prints one time (at the beginning of the report)
Page Header : Prints at the top of each page (including the first page)
Group Header : Prints once
Master Header : Prints one time for each item in a list
Detail : Prints one time for each item in a list
Master Footer : Prints one time for each item in a list
Group Footer : Prints once
Page Footer : Prints at the bottom of each page, except for the first page.
Note: The page footer will not print on the BOL because the Supplemental
page (page 2) is considered a separate report.
Report Summary: Prints one time (at the end of the report)
Note: We do not recommend placing a Master or Detail band below the Group Footer; this is known to have unexpected results.
Bar Code ![]()
After placing the bar code field, select the bar code type from the Type drop-down list. Choose the degree of rotation.
Code 128
This is a very high density barcode supporting alphanumeric characters and the ASCII character set.
Code 39
This is a common bar code type used extensively in non-retail environments. It is also known as "3 of 9 Code" and "USD-3".
PDF417
This is a widely used 2-dimensional stacked barcode composed of rows of linear barcode. "PDF" stands for Portable Data File; "417" is based on the fact that each encoded code word in the barcode is represented by four bars and four spaces, with the width of each code word being 17-module wide.
GS1-128
Previously referred to as UCC/EAN-128 or EAN-128, these bar codes can carry all GS1 Keys and attributes but cannot be used to identify items crossing Point of Sale. GS1-128 is a standard that consists of both a Code 128 bar code symbol with a special start pattern and a data structure.
ITF
The ITF-14 is a 14 digit barcode generally used to mark the packaging levels of products that have an EAN identifier. It is based on the I2of5 (Interleaved Two of Five) barcode and encodes a Global Trade Item Number.
If you want the bar code to be additionally printed as text, enable the
Human readable check box.
Click the Data button and select
the StarShip Data field to display as a barcode.
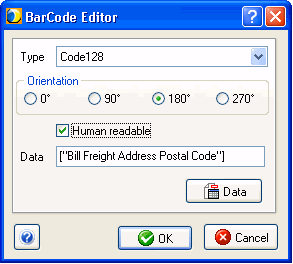
To edit the barcode settings, double-click the bar code that has been inserted
into the form.
Lines ![]()
Click and drag to draw a vertical or horizontal line
on the document. The line can be resized by dragging on the end handles.
Use the Frame Width control to increase the line thickness.
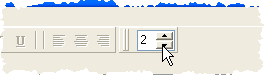
Image File 
Click the cursor in the position where you want to insert
the image, and select the image file from the explorer window. The following
image formats are supported: BMP, JPG, ICO, WMF, and EMF.
Carrier Shipping Label 
Click the cursor in the template to insert the label.
For more information, see SmartLabels.
Note: Pallet and Pack item fields (those necessary to build a Packing List, for example) are only currently available for Package and Pallet Labels.
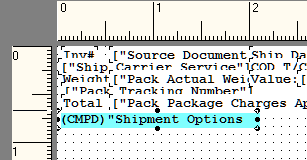
When working with templates, you can combine multiple fields and text to make compound fields that will print as one field on a label or document.
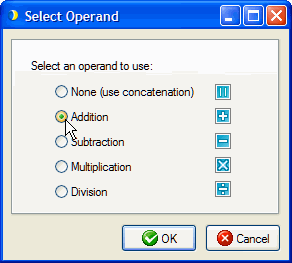
Consecutive numeric fields can also be calculated -- you can specify operators while building the compound field.
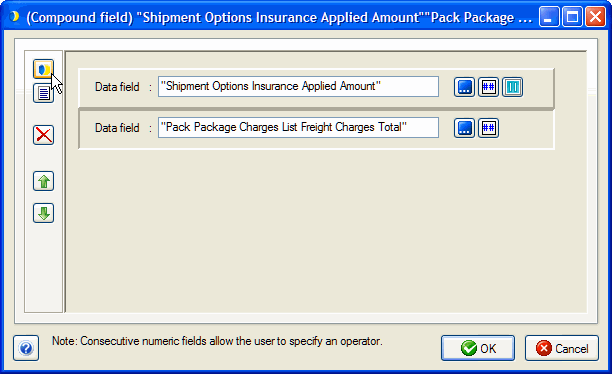
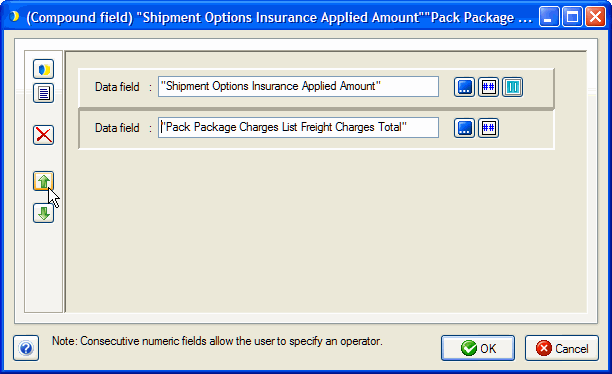
 button to select an operator and click OK. If you only want to connect
the fields without calculating them, choose "None (use concatenation)".
button to select an operator and click OK. If you only want to connect
the fields without calculating them, choose "None (use concatenation)".