Yellow Freight and Roadway have combined to become YRC, a freight carrier rating service that supports shipment rating and processing exclusively for YRC freight carriers. The new YRC SCAC is RDWY.
StarShip support for YRC allows you direct access to your YRC negotiated rates. You can generate a PRO#, tender the shipment, and request a pick-up. You can also print YRC-generated labels and BOLs.
If you don't already have a contract, you will need to go to my.yrc.com to register. This process can take 2-3 business days. Registered MyYellow.com users do not need to re-register for my.yrc. If you forgot your User Name and Password, you can email or call 1-800-548-0435 to request the information.
You will need to complete and fax a Non-Disclosure Agreement form before implementing Rate Quote API. You can download that form here :
Rate Quote API Non-Disclosure Agreement
If you do not fax this completed form back to YRC, you will receive errors when attempting to rate shipments.
Have your username and password available when you enter your account information in StarShip.
Once you have your account information, you can enter it into StarShip from Setup > Carrier Interface > YRC or in the Carrier Interfaces section of the Initial Setup wizard.
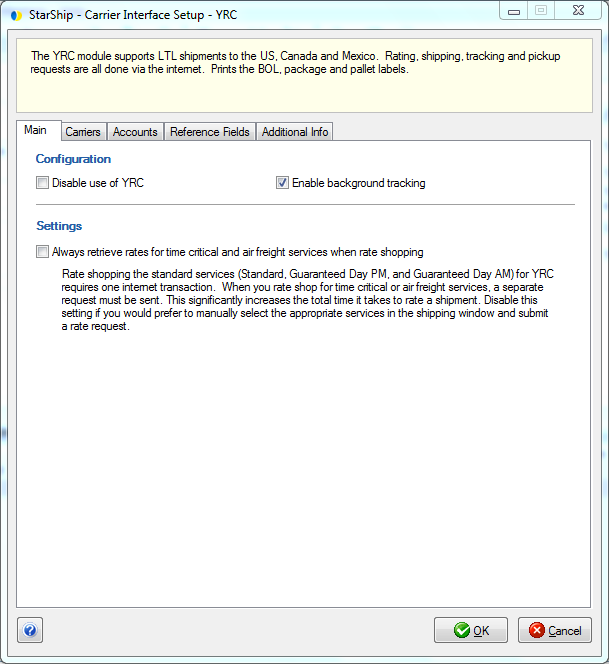
Configuration
Disable use of YRC : Check this option if you do not want YRC to be used when rating shipments. In this case, YRC will not appear as an Account option on the Shipment tab.
Enable background tracking : Check this option to have StarShip track shipments as a background process.
Settings : Always retrieve rates
for time critical and air freight services when rate shopping: Leaving
this option unchecked
means that rates for time critical or air freight services will not be
retrieved when you rate a shipment. This significantly speeds up the rate
request, making the rating process faster. When this setting is not enabled,
you can still retrieve rates for a single time critical or air freight
service by selecting that service on the Shipment tab before pressing
the Rate button to rate the shipment.
This tab lists carriers supported by YRC, their SCAC code, and carrier type. Carriers are pre-loaded by StarShip when the YRC interface is registered and it is currently not possible to add or delete carriers; however, you may disable a carrier on the Accounts tab.
The Accounts tab is where you set up the account information for your YRC Freight account(s). Under the Accounts section, you can add, edit, or delete accounts by selecting the appropriate button.
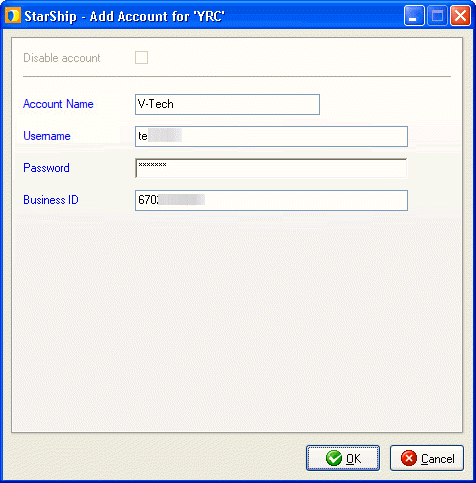
Click the Add... button. Then enter following account information to set up YRC Freight accounts:
Account Name : Type in a name that will help you to identify this account in StarShip.
Username : Type in the username for your YRC account.
Password : Type in the password assigned to your my.yrc.com profile. This is not the password you use for your my.yrc.com website login.
Business ID
: Type in the business ID assigned to your YRC account. You can obtain
your Business ID from your YRC Rep or by completing the YRC Non-Disclosure
Agreement above.
You must set up at least one YRC account to be used as the default shipping account. The first account you add to StarShip is designated as the default account.
If you add other accounts, you can designate a different default account by checking the "Default" check box for that account:
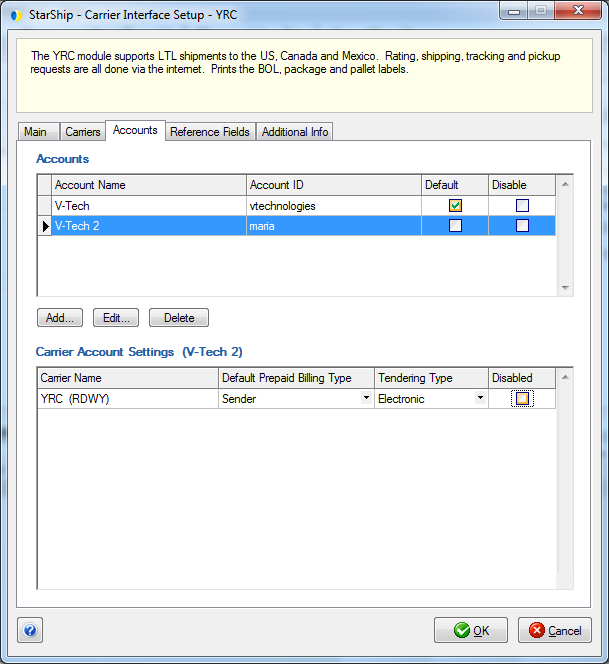
When this carrier is selected for a shipment, the default account will be set on the Shipment tab if possible.
Note : There can be only one default carrier interface for each carrier regardless of the User ID/Location of the currently logged-in user.
Disable Account
You can disable accounts by selecting the account and clicking the "Disable" check box for that account. Once disabled, you will not be able to rate or ship using this account and it will not be available in the Accounts drop-down field.The default account cannot be disabled.
This section allows you to change specific settings for the listed carriers.
If you set up multiple accounts, you can maintain different settings for
each account. To change settings for accounts, click on the desired account
and then make your changes by selecting from the drop-down lists.
Default Prepaid Billing Type
This is the default Billing Type for shipments that are paid for by the shipper. You can select from Sender or any other 3PL that you set up in Maintain > 3PL.
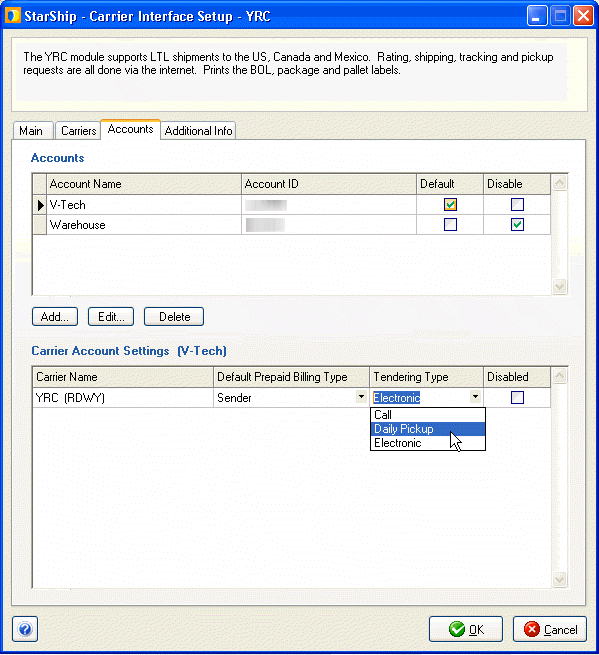
Tendering Type
The choices are Electronic, Call, and Daily Pickup.
Disabled
Check to disable the carrier. Once disabled, you will not see rates for this carrier when you rate a shipment, nor will this carrier appear on the Shipment tab when Bill Freight Type is set to Prepaid. The carrier will still be available when Bill Freight Type is set to Third Party or Recipient.
Note: When you add or edit an account on the Accounts tab, changes to the database are immediate. However, if you delete an account, but then click the Cancel button on this dialog, the account will not be deleted from the StarShip database.
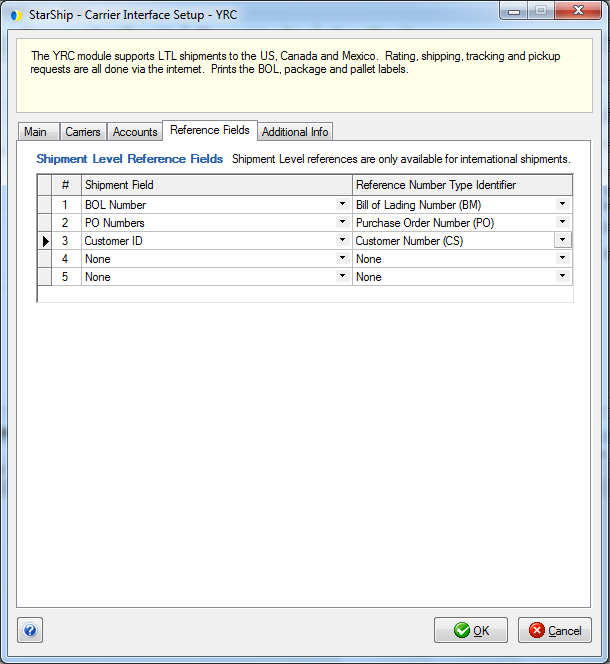
StarShip supports 5 shipment level reference fields for international shipments. Shipment Reference #1 and #2 are auto populated with the BOL number & PO Number, which can be altered or removed.
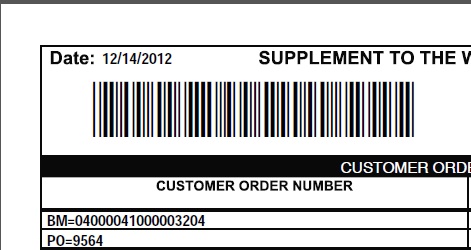
Known Issue : When using Store Number and Dept Number, and these fields are populated on the Ship screen, the BOL Number does not print in the "B/L Number" section at the top of the BOLs. Instead, it prints in the Customer Order Number section, as "BM=", with any other reference fields (see example below).
This tab displays the supported billing types and shipment options available for this carrier interface.
YRC labels and BOLs are automatically loaded into StarShip. These documents are PDF files that can only be printed when shipping through the YRC carrier interface. You can enable/disable the YRC Straight or VICS BOLs from Setup > Printing > Manage Documents, as described in Printing Setup.
Label settings can be found in Setup > Printing > Manage Labels and can be configured as described in Label Setup. YRC package labels can only be printed on laser labels. If you want to print thermal labels, you can select to print the default V-Technologies-designed package labels.
Note : If you configured Documents during the Initial Setup Wizard, those documents are automatically set up to Auto-Print On Ship. To change this, go into Setup > Printing > Manage Documents and under Document Settings change the Auto-Print setting.