
StarShip's UPS module supports small parcel and international shipments, with AES Direct integration for shipments requiring EEI (Electronic Export Information) filing.
UPS negotiated rates
In order for StarShip to be able to retrieve your negotiated rates, this functionality needs to be enabled by UPS for your account.
StarShip utilizes the UPS Developer Kit to access up-to-date negotiated rates. The UPS Developer Kit does not support rating the following options : Dry Ice, HazMat, and Return Services. For these options StarShip will reflect the current, published rates.
To access UPS settings, select Setup > Carrier Interface > UPS.
This tab displays information about UPS communication settings and currently registered UPS accounts for this StarShip installation.
Configuration
Disable use of UPS : Check this check box if you do not want UPS to be available for rating or shipping. UPS will not appear in the Carrier field on the Shipment tab.
UPS Terms and Conditions Accepted : Check this check box if you have read and agree to the UPS Terms and Conditions, accessible by clicking on the "Read..." link.
Tracking
UPS Developer Kit Tracking Terms and Conditions accepted : Check this check box if you have read and agree to the UPS Developer Kit Tracking Terms and Conditions, accessible by clicking on the "Read..." link.
Enable background tracking : Background tracking collects shipment data so that you can look up delivery information for past shipments and generate late delivery reports from the StarShip Dashboard.
Background tracking must be globally enabled for StarShip in the StarShip Server under Tools > Options > Background Tracking. It can then be enabled/disabled for each individual carrier in carrier setup.
The Carriers tab will only show UPS as a supported carrier. Entries
cannot be added or deleted.
This section displays the UPS account or accounts that are linked to your StarShip registration. The Contract Services section on the bottom right displays the contract services you selected for this account (see Account > Settings). Enabled services will have a green dot beside them (see below).
See Set up a UPS account for instructions on how to set up one or more UPS accounts.
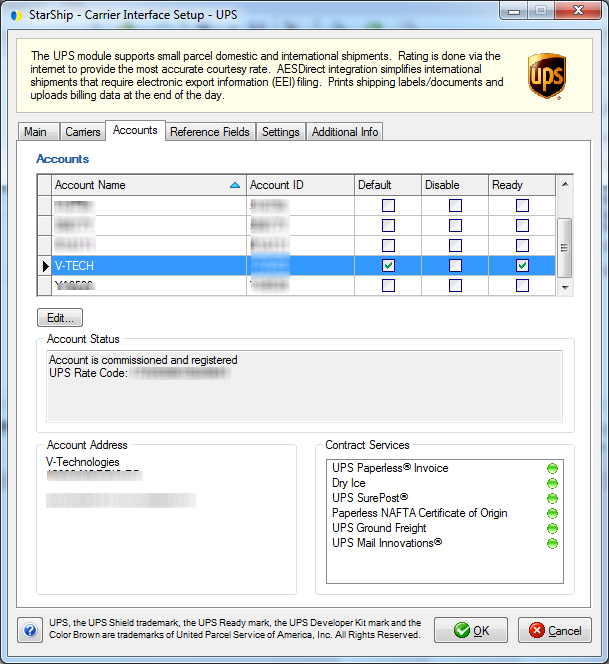
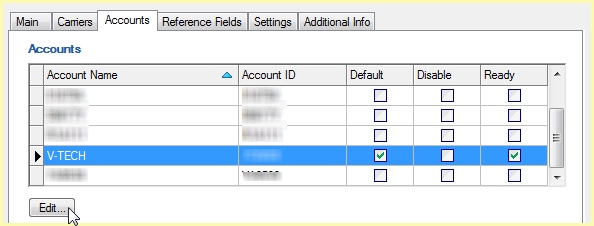
Once your account is added, you can configure account properties by selecting the account and clicking the Edit button.
Account properties are broken up into the following sections :
This is the address and contact information for this account.
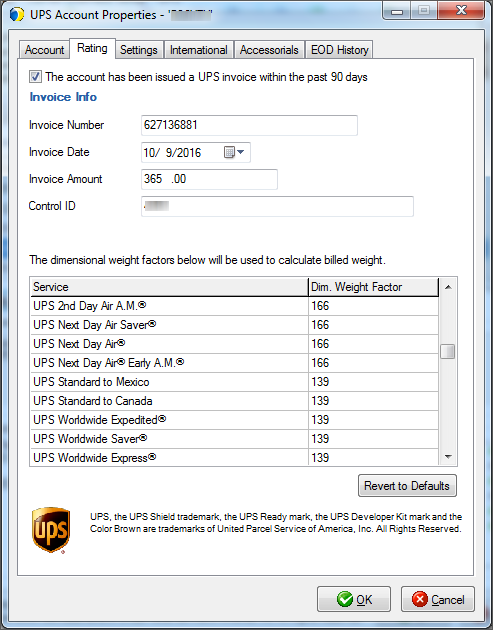
This account has been issued a UPS invoice within the past 90 days
Entering the invoice information will add the account to your UPS profile. This will allow shipping with UPS Web Services and access to the account's negotiated rates. Check this option if have a UPS invoice from the past 90 days : "This account has been issued a UPS invoice within the past 90 days". Then, fill in the Invoice information from your last UPS Delivery Service Invoice.
Note : When registering a new UPS account with Web Services, the invoice information is required to enable shipping with UPS Web Services for accounts that have been issued an invoice within the past 90 days.
Dimensional Weight Factor
For each UPS service, you can enter custom dimensional weight divisors that are used to calculate the billed weight. Although UPS calculates and returns both the list (published) and custom rates, only the list value of the billed weight is returned. The dimensional weight factors below are used by StarShip to calculate and display the custom billed weight value on the Ship screen.
The factors default to list (published) values, but can be modified here to reflect contract rates. This will not affect the charges, only the billed weight that shows on-screen. So, for example, If you have any freight rules that use the billed weight field, it will be updated so that freight rules work correctly.
Use the Revert to Defaults button to reset values to the original defaults.
The default dimensional weight for U.S. domestic service packages and Canada Origin packages to the U.S. are calculated as follows :
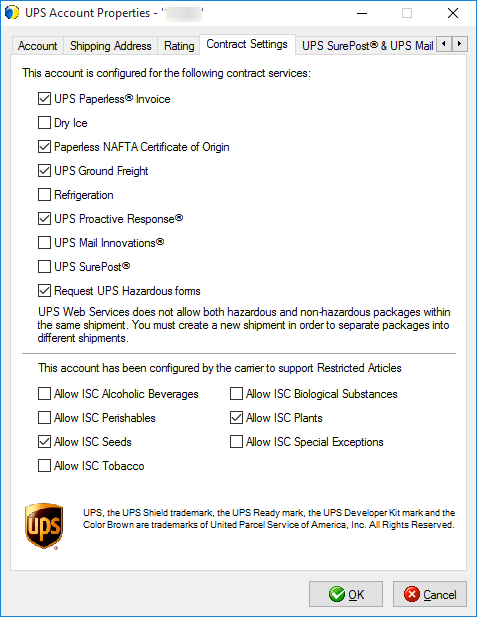
Contract Services
Select or deselect your registered contract services based on what you want to allow. If you select a service for which you are not registered, you will get an error when you try to rate/ship.
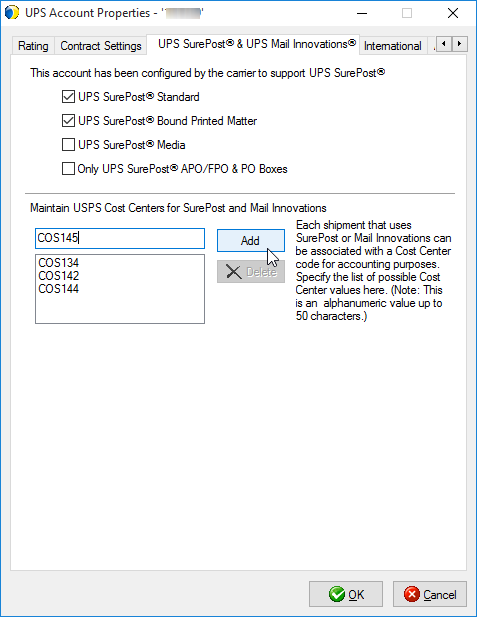
UPS Mail Innovations and UPS SurePost
When you enable one or both of these options, you will be able to select the Services to include and add or maintain USPS Cost Centers on the next tab, UPS Mail Innovations and UPS SurePost.
Request UPS Hazardous forms
When shipping UPS HazMat shipments prior to StarShip v9.1, users had to use a different system, such as Labelmaster DGIS (previously Masterform), to generate the hazardous forms. With StarShip v19.1 and higher, UPS Web Services can now validate HazMat shipments and return the required shipping papers.
Check this option if you want to use the UPS-generated hazardous forms. A few notes before you select this option:
UPS Web Services does not allow the combination of hazardous packages and non-hazardous packages in the same shipment. When the option to Request UPS Hazardous forms is checked, you will be required to create different shipments for hazardous and non-hazardous packages. If you want to create shipments with both hazmat and non-hazmat packages, you can leave this option unchecked and continue to use Labelmaster to generate your UPS HazMat shipping documents.
When you check this option,
you will need to use different label stock to print the hazardous
forms.
For more information on acquiring and printing the required forms,
see UPS HazMat/DG Shipments.
Restricted Articles
Certain items that UPS lists as restricted can still be shipped on a contractual basis but you must have a contract with regular volume and be able to adhere to all regulations before UPS accepts it. Once your contract has been approved to ship restricted articles, you can select those items you were approved for here.
If you enabled the UPS SurePost service, at least one SurePost service must be selected. If the "Only UPS SurePost APO/FPO & PO Boxes" box is selected, SurePost will only be available to those specific destinations.
When shipping from multiple locations with a single
account, you can use the Cost Center to differentiate between locations.
In the field provided, enter a Cost Center code and click Add. The code
may be alphanumeric and is limited to 50 characters. You can add multiple
cost centers, which appear in the list below. The Cost Center is optional
for both Mail Innovations and SurePost shipments.
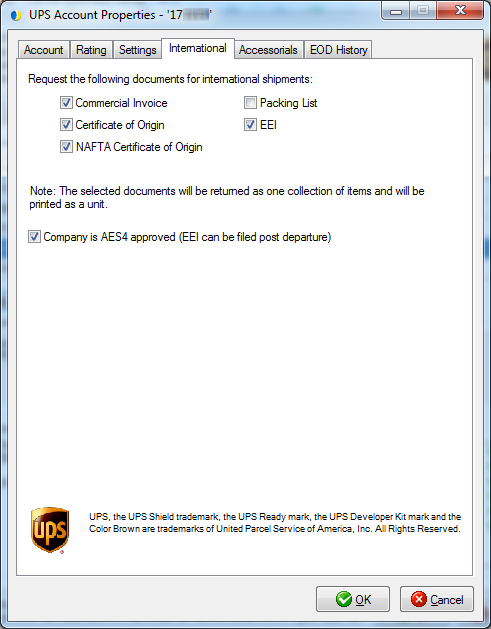
Next, configure International settings. The first section allows you to select the International documents to request from UPS when you process an International shipment. The documents will be compiled together into one PDF file, called the "UPS International Forms". For more information, see International Documents Setup.
Documents
Place a check mark next to the documents that you want to print. When you are done, click OK twice to exit UPS setup.
Company is AES4 approved
If you are AES4 Approved, check this box so you can
file the EEI post-departure. This setting must
be enabled in order for the EEI post-departure option to appear on the
International tab when processing International shipments.
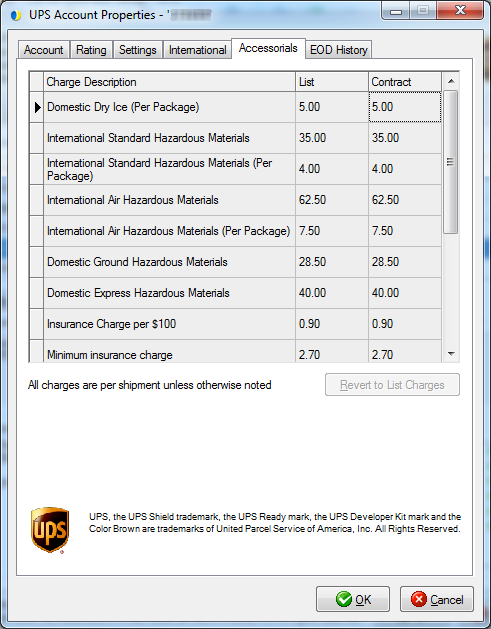
These are the list and contract charges for some accessorials for your UPS account. Only the accessorials not supported by the UPS Developer Kit will be shown in this grid. If you are currently using the Contract charges, you can use the Revert to List Charges button to go back to list rates.
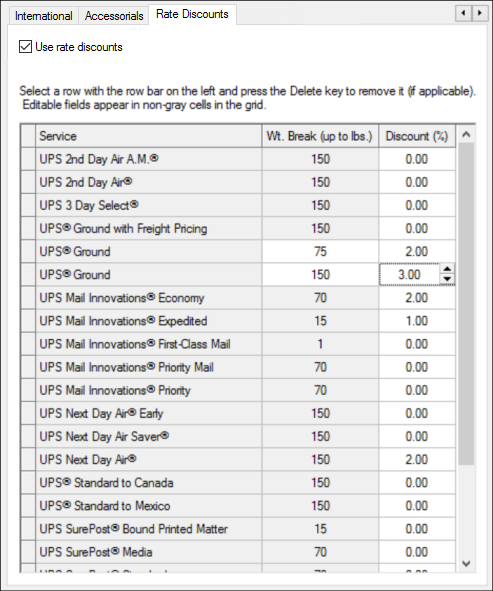
This section allows users who signed up for a UPS account through Worldwide Express to set up their rate discounts for WWEX or Unishippers.
Check the "Use rate discounts" check box to enable Worldwide Express. You can then enter the discount percentage for each service you use.
The weight break is the weight threshold at which your discount percentage is applied. Only the UPS Ground service allows you to enter a different weight break. To change the weight break, click in the "Wt. Break" field and enter the new weight break. Then, add the corresponding discount percentage.
When shipping, the Contract charges will be the UPS List rates minus the discount percentages you set up here.
This tab allows you to browse end of day history based on Posted Date or a date range, and status. You can also reprint end of day documents for shipments.
See : End of Day History
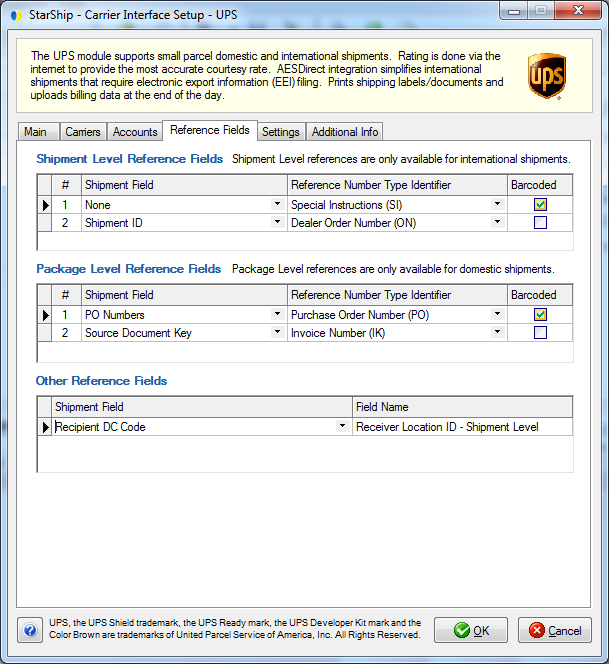
Reference fields allow the recipient to track incoming packages using a reference field (such as the PO#) along with the ship date or your shipper number, or other information that may not normally appear in a shipment’s details.
StarShip supports up to two Reference fields at the Shipment Level for international shipments, and two Package Level reference fields for domestic shipments. There is also one other reference field provided for the Receiver Location ID at the Shipment Level.
One reference field from the Shipment Level and the Package Level fields can additionally be printed as a barcode below the reference fields on the shipping label. A 4 x 6.75 or larger label is required to use barcodes.
Note: Reference fields do not print on the UPS SurePost label.
Configure Reference Fields
Specify the shipment fields to include as reference
fields by selecting them from the drop-down lists. Each of the standard
shipment and package level reference fields have a two letter identifier
to help the recipient identify the nature of the information. Check the
"Barcoded" check box to select a field to be printed as a barcode.
Reference fields and identifiers are uploaded to UPS when the shipment
is processed.
This tab contains miscellaneous settings for adding information to labels under specific conditions.
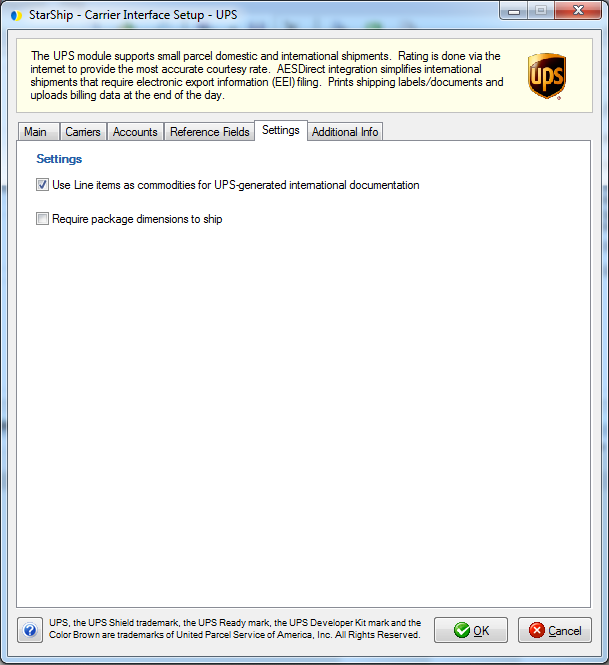
Use line items as commodities with UPS-generated international documentation
When this setting is checked, StarShip will individually upload each line item to UPS in the PLD file. For example, two items identified by the same code will be uploaded as two lines : Item A with quantity 1 and Item B with quantity 1, along with the individual item description, value, etc.
When unchecked, the items are rolled up by Schedule B Code in the PLD upload to UPS. So in the example above, the two items will be uploaded as one line with a quantity of 2, and the item description is derived from the Schedule B description.
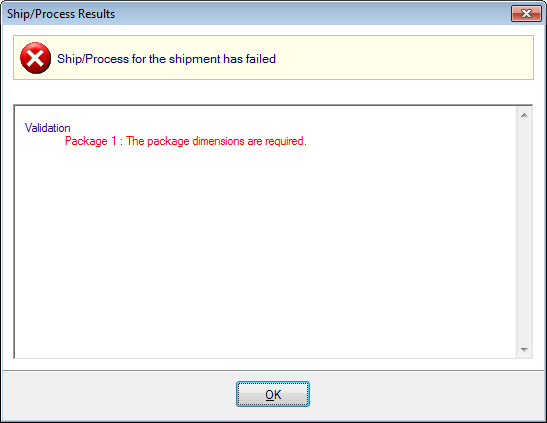
Require package dimensions to ship
When checked, package dimensions must be entered on the Packaging tab in order to Ship/Process a shipment.
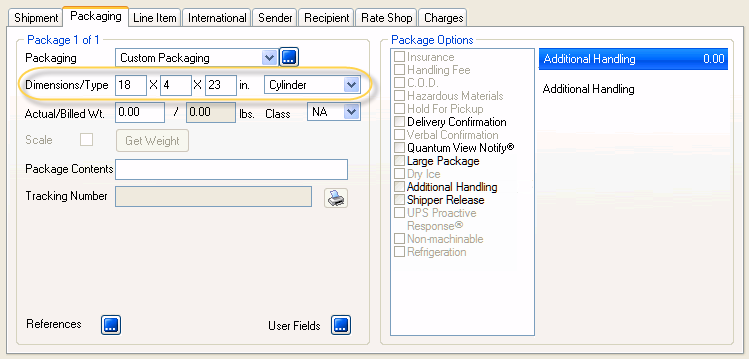
If this option is checked and package dimensions are
missing from the shipment, Ship/Process will fail and an error message
displays.
This tab displays the supported billing types and shipment options available for this carrier interface.