Set Up a UPS
Account
Have your account information available when following this procedure.
Set up a new account
Add an account (to an already commissioned
system)
Change account info
Set up a new account
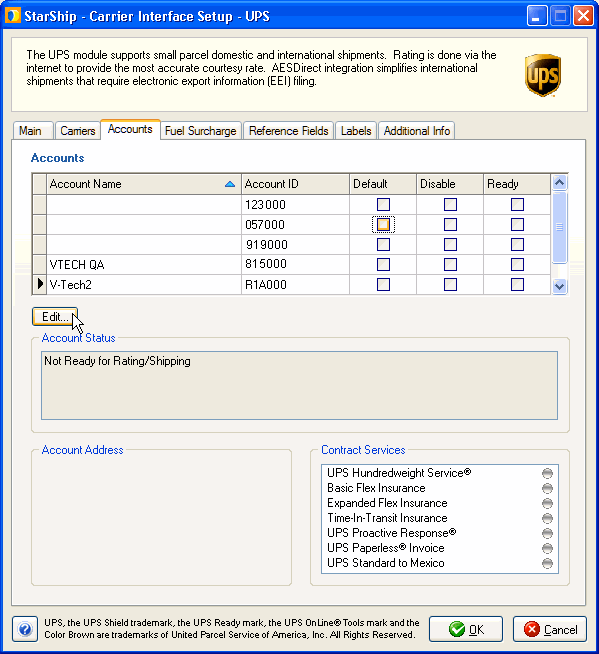
- Available UPS accounts are defined by your registration
key. Select the UPS Account from the Accounts grid and click the Edit
button. You can also double-click the account.
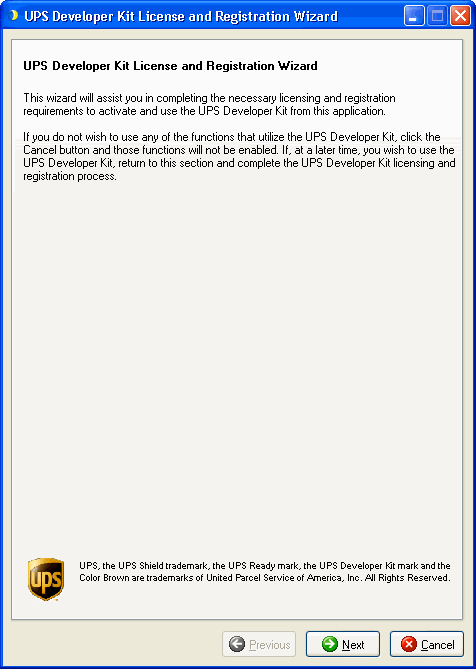
- When the Account wizard launches, click Next.
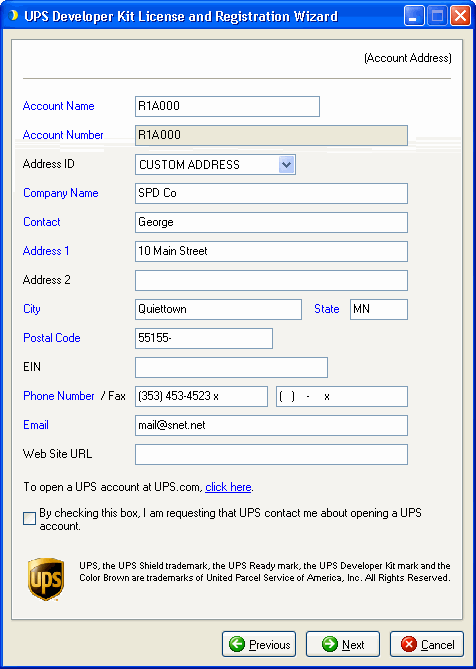
- Type in the account and address information. You
can also select a previously set up Address ID from the drop-down
list to populate the address fields. Click Next.
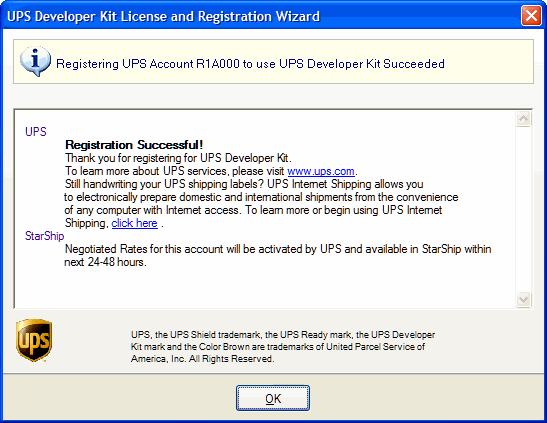
- The UPS Developer Kit License and Registration Wizard
helps you to complete the necessary requirements for registering the
UPS Developer Kit. You will need to register each account individually.
Complete the steps provided by the wizard.
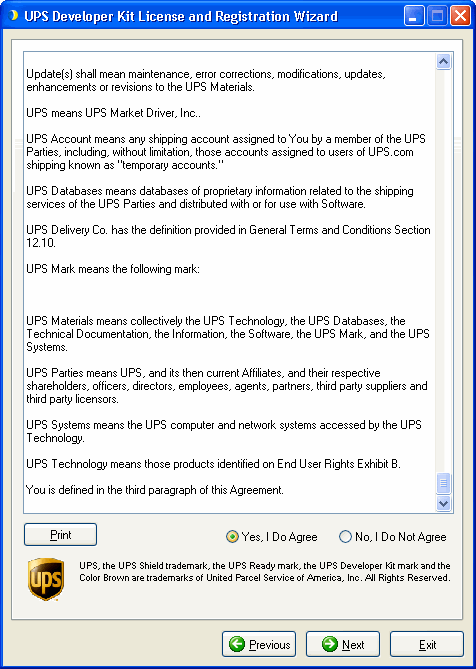
Please read the terms and conditions of the UPS technology agreement
required for use of the UPS Developer Kit. You must scroll to the
end of the agreement in order to enable the “Yes, I Do Agree” radio
button. You can also print the agreement by clicking the Print button.
When you have agreed to the terms by clicking Yes,
I Do Agree, the Next button is enabled and you can continue
with the setup process.
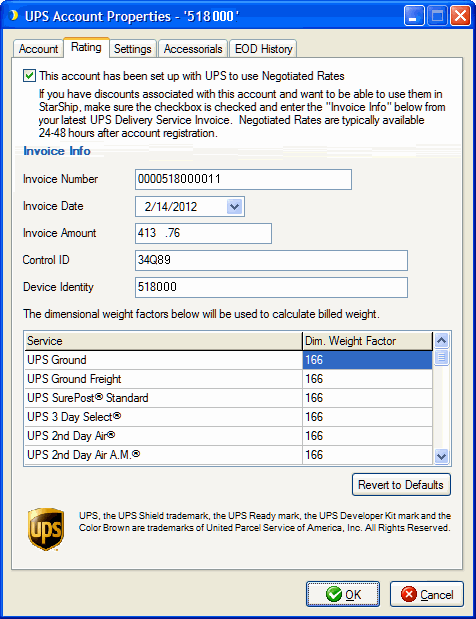
- Negotiated Rates
Once you click Next, you can set up your account to use negotiated
rates. Check "This account has been set up with UPS to use Negotiated
Rates" if you have set this up with your UPS Account Representative.
Then, fill in the Invoice information from your last UPS Delivery
Service Invoice. As noted on the dialog, it may take between 24-48
hours after you register the account to use your negotiated rates.
Dimensional Weight Factor
For each UPS service, you can enter custom dimensional weight
divisors that are used to calculate the billed weight. Although UPS
calculates and returns both the list (published) and custom rates,
only the list value of the billed weight is returned. The dimensional
weight factors below are used by StarShip to calculate and display
the custom billed weight value on the Ship screen. The factors default
to list (published) values, but can be modified here to reflect contract
rates. This will not
affect the charges, only the billed weight that shows on-screen.
So, for example, If you have any freight
rules that use the billed weight field, it will be updated so
that freight rules work correctly.
Use the Revert to Defaults button to reset values to the original
defaults.
The default dimensional weight for U.S. domestic service packages are
calculated as follows :
U.S. domestic services packages that are
greater than 1,728 cubic inches will use a 139 divisor to calculate
dimensional weight.
U.S. domestic services packages less than
or equal to 1,728 cubic inches will continue to use a 166 divisor
to calculate dimensional weight.
- Click Next. StarShip sends a commissioning request
to UPS. If successful, this is reflected in the UPS Transaction window.
The wizard then steps you through the Settings
and Accessorial Charges setup
dialogs.
See also : Account Settings
Add an Account
When you add a new account to a system that is already commissioned,
StarShip sends an “add shipper” request for the existing Mailbox ID, which
returns the book and page number. After the add shipper request has been
sent, you will then register the UPS Developer Kit.
- Double-click the account on the Accounts tab. Then,
click Next on the first dialog of the wizard.
- Enter the account and address information. Click
Next.
- The UPS Add Shipper request is sent. Click OK.
- Scroll to the bottom of the agreement and select
Yes, I Do Agree. Click Next.
- Negotiated Rates
Once you click Next, you can set up your account to use Negotiated
Rates. Check "This account has been set up with UPS to use Negotiated
Rates" if you have set this up with your UPS Account Representative.
Then, fill in the Invoice information from your last UPS Delivery
Service Invoice. As noted on the dialog, it may take between 24-48
hours after you register the account to use your negotiated rates.
Dimensional Weight Factor
For each UPS service, you can enter custom dimensional weight
divisors that are used to calculate the billed weight. Although UPS
calculates and returns both the list (published) and custom rates,
only the list value of the billed weight is returned. The dimensional
weight factors below are used by StarShip to calculate and display
the custom billed weight value on the Ship screen. The factors default
to list (published) values, but can be modified here to reflect contract
rates. This will not
affect the charges, only the billed weight that shows on-screen.
So, for example, If you have any freight rules that use the billed
weight field, it will be updated so that freight rules work correctly.
Use the Revert to Defaults button to reset values to the original
defaults.
The default dimensional weight for U.S. domestic service packages and
Canada Origin packages to the U.S. are calculated as follows :
- U.S. domestic services packages that are greater
than 1,728 cubic inches use a 139 divisor to calculate dimensional
weight.
- U.S. domestic services packages less than or
equal to 1,728 cubic inches use a 166 divisor to calculate dimensional
weight.
- UPS Standard from Canada import shipments use
a 139 divisor to calculate dimensional weight.
- Click Next. StarShip sends a registration request
to UPS. The result is displayed in the UPS wizard dialog.
- Click OK to configure
UPS Settings and Accessorial
Charges.
- You return to the Accounts tab, and under Account
Status you can see the account registration status. The status will
show the Add Account process as being incomplete until UPS returns
the book and page number for this account. This may take up to 48
hours.
When UPS replies to the add shipper request, the account status will
show the account has been added and registered.
Change
Account Info
If you change account information, StarShip will send the updated account
information to UPS.