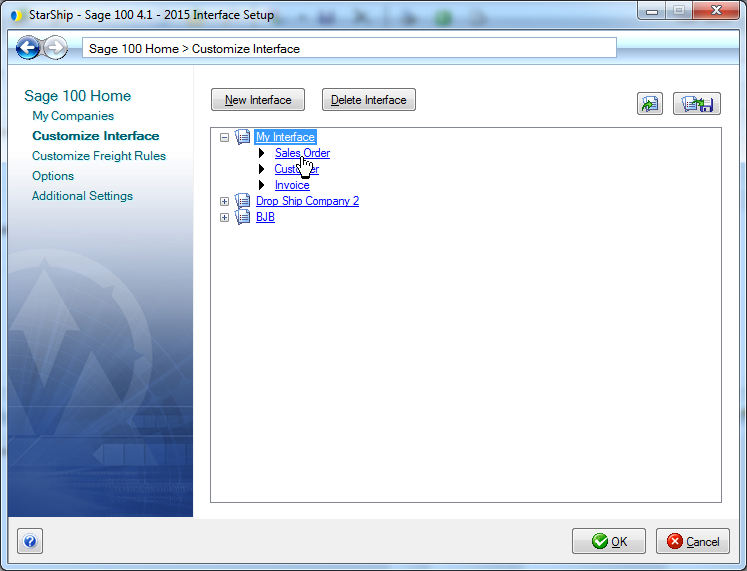
Customize Interface
StarShip allows you to customize the way data is translated between Sage 100 source documents (Sales Orders, Customers, Invoices) and the StarShip shipment entry screen. Customize Interface controls how the data in the source document is translated. It defines what information populates the shipment fields, and how the data is interpreted into accepted shipment values. A set of field maps and value translations is called an "interface."
StarShip comes with one predefined interface called "My Interface" that installs default field maps for Sage 100 documents, which you can customize. You can also create multiple interfaces to use with different companies if you plan to map to user-defined fields that vary between companies.
In summary, the interface defines:
Field Mapping : how shipment fields are mapped to your ERP system sources
Value Translations : how values are translated between your financial system and StarShip shipment fields
You will either access an interface from Setup > Source Interface > Customize Interface, or from the Initial Setup wizard. Then, you must select an interface and a document type (Sales Orders, Invoices, Customers) to access the Customize Interface window, where you can define field mapping and field values.
The interface can be customized as follows:
-
Map any StarShip shipment field to a fixed value or to an available Sage 100 field. A pre-defined list of Sage 100 ERP fields is accessible for each document.
-
Map user-definable fields (from Custom Office) to the StarShip shipment. User-defined fields from the tables below are supported:
-
-
Customize value translations for field mappings such as ”Ship Via” (in Sage 100) to "Carrier” (in StarShip).
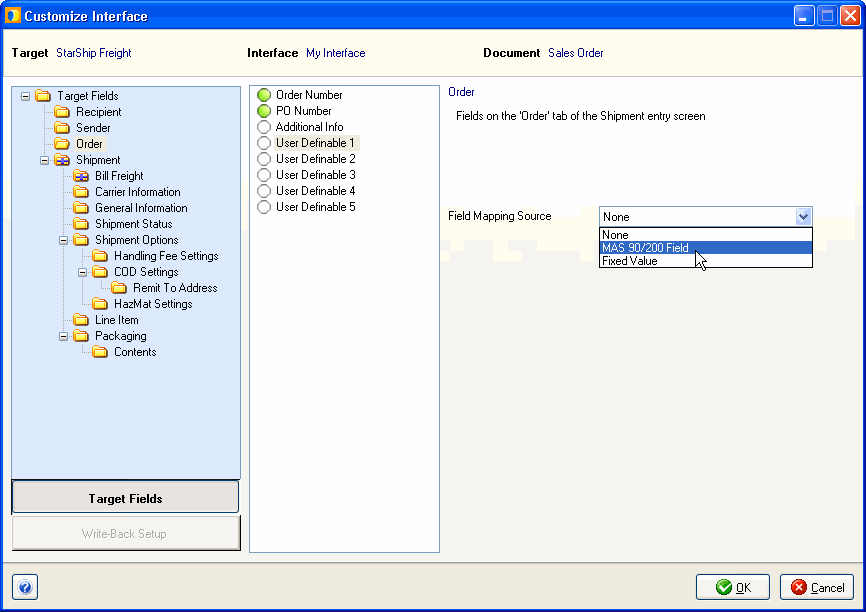
Mapping fields
This example shows you how to map a field containing Salesperson information from the Sage 100 sales order to a user-definable field on the StarShip shipment entry screen.
-
In Customize Interface, select the document (Sales Order, Customer, or Invoice.).
-
Select a Target Field group on the left-hand side of the window.
-
In the center panel, select the shipment field to which you want to map.

-
In the Field Mapping Source field, select a source.
-
In the Sales Order or Customer source field, either type in a value if you selected Fixed Value or select a field from Sage 100.
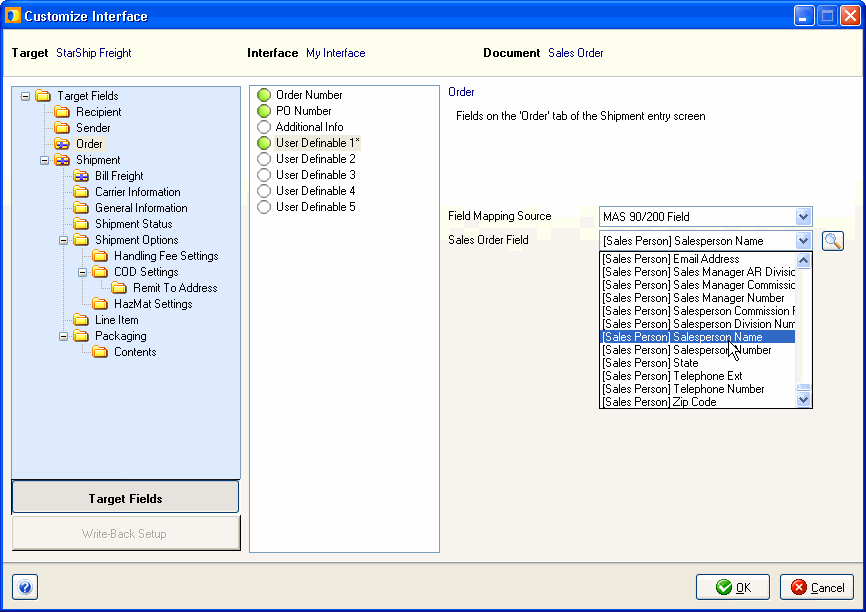
Customize Value Translations
Many fields in Sage 100 are mapped by default as part of the basic interface. If you want more control over how data is translated from Sage 100 into shipment fields, you can add or customize field mapping and value translations to suit your company's needs.
For example, a common field map is from "Ship Via" in the ERP system to "Carrier" in StarShip. You can customize this field map based on the carrier values set up in Sage 100. Here's how to do that :
-
Click Customize Interface.
-
Select the document (Sales Orders, Customers, etc.).
-
Expand the Target Field group "Shipment" and then select the Carrier Information folder.
-
In the Shipment fields section, choose Carrier - Service.
-
By default, the Field Mapping Source is set to Sage 100 Field. The source document field (Sales Order field, Customer field, etc.) is set to Ship Via.
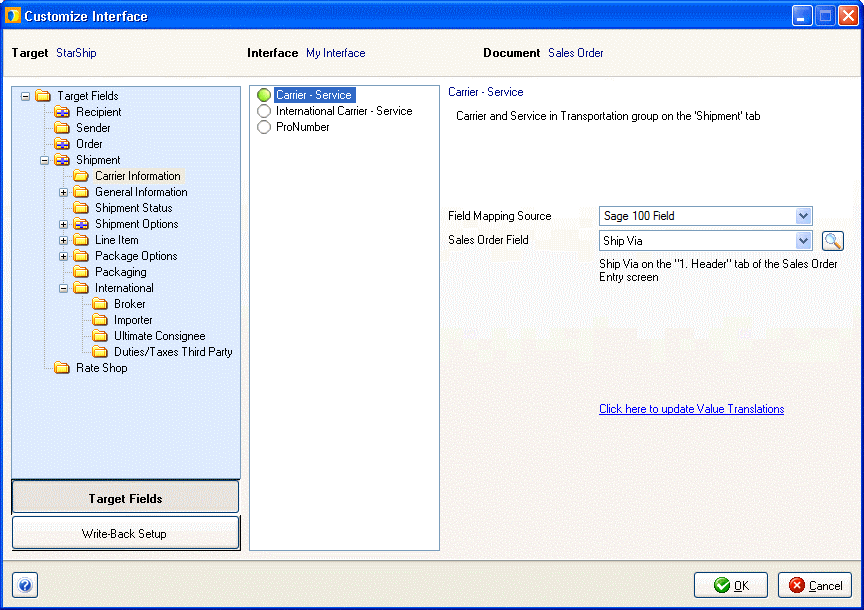
-
Select "Click here to update Value Translations."
-
The Value Translations dialog shows you the way Ship Via is currently mapped to the Carrier - Service value in StarShip. Adjust the values:
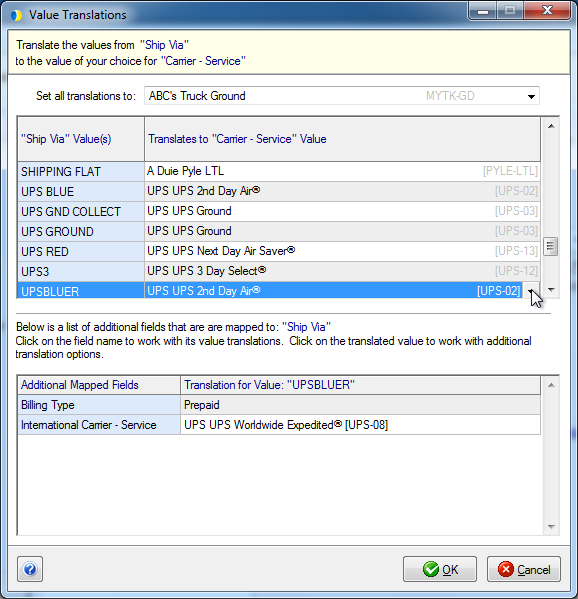
-
Click OK.
User Definable Fields
Controlling Package/Pallet User Definable Fields
When importing a document, you can map these fields to a fixed value, and Sales Order/Invoice level fields, but not Package Content and Line Item fields. Note that the value that you set for Packaging Type (Shipment > Packaging > Type) determines whether the Package or Pallet fields are imported, since you can only import into one or the other. The default value is boxes and means that the Package User Definable fields would be used by default. Note that Pallet User Definable fields only apply to Freight shipments, and not for Parcel. For more information, see User Definable Fields.
Importing Values from the ERP System
When mapping to User Definable fields from your ERP system, although it is possible to map StarShip User Definable fields to different level source fields, we recommend that you only map User Definable fields to the same level fields from the ERP system. For example, you might want to map StarShip Line Item User Definable fields to a sales order or invoice level field, like Sales Order Number. This can produce unpredictable results when there are multiple sales orders on the same shipment containing the same line item. In that case, StarShip would use the first value it receives to populate the User Definable field to which you mapped.
Write-Back
Source Interface Setup’s default interface defines options used to write freight and tracking information back to Sage 100 when you ship against certain document types (such as Sales Orders and Invoices). Write-back status, if supported, is viewable on the Sage 100 tab on the StarShip Ship screen.
-
From Setup > Source Interface > "Sage 100 (your version)" and click Customize Interface.
-
Next, select the document link (for example, Sales Orders).
-
On the bottom left of the Customize Interface window, click the Write-Back Setup button.
Freight Settings
For freight write-back, you can decide when and if freight is written back to source system document.
-
Select the Freight Settings node.
-
Make a selection from the available freight write-back choices:
-
-
Always write freight to (source document): When you save or void a shipment in StarShip, the freight amount is written back to your source document.
-
Prompt shipper to write freight to (source document): When you save or void a shipment in StarShip, the shipper receives a prompt asking if freight should be written back to the source document.
-
Do not write freight back to the (source document).
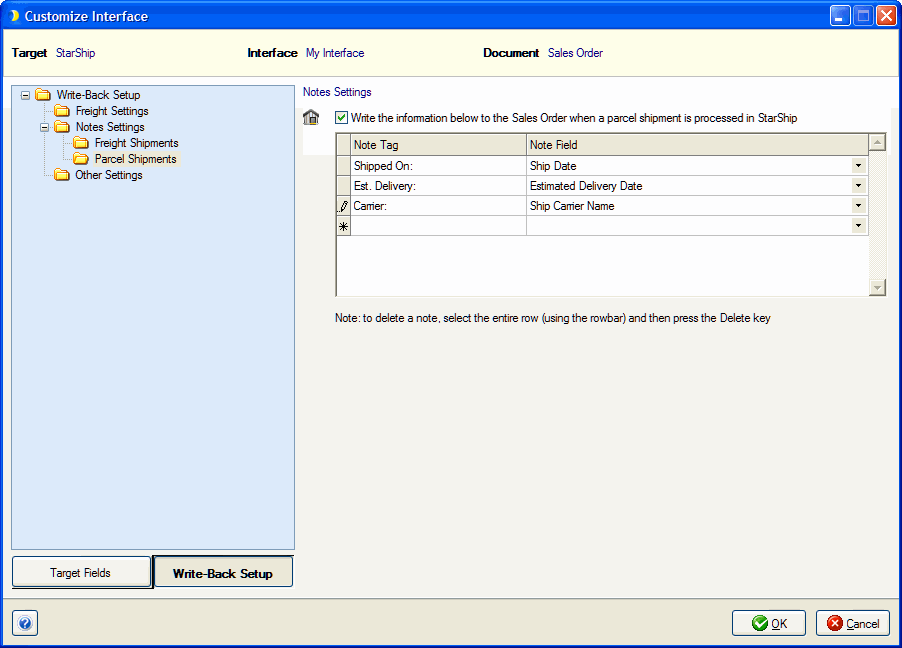
Notes Settings
This section defines Notes write-back for Parcel and/or Freight shipments. Notes settings only apply when StarShip is set up to not create the invoice on write-back.
Write the shipment notes in StarShip 9.x compatibility format
This setting deals with write-back by location (if shipping with multiple locations). It is checked by default. In version 9.x the location field was optional. The current version of StarShip automatically retrieves the location when writing notes back to Sage 100. Therefore, if you do not want to use the location, you would check this check box and StarShip will disregard location info.
Important! You should deselect this option if multiple locations will process shipments against the same orders on the same days.
Freight/Parcel Shipments
What field values should StarShip write back to the order?
To allow Notes Write-Back, check the "Write the information below to the <document> when a parcel/freight shipment is processed in StarShip" check box.
Then, you can:
-
- Add or modify the Note Tag or Note Field names : The Note Tag is the printed title; the Note Field is the field value in StarShip that will be written back to Sage 100 under its corresponding Note Tag. To change an existing entry, click in the row and type or make a selection from the drop-down list when applicable. When you type in a Tag row, a pencil icon is activated to the left of it. A selected row will have a triangle next to it. Note that there is a 2048 character limit for the Note Tag field.
- Add Tag/Field names : To add Tags, position the cursor in a blank field and begin typing. Then, select a Note Field Name from the drop-down list to be associated with the new Tag.
- Delete a row: Hover over the rowbar until an arrow appears. Single-click with the mouse so that the row is highlighted. Then, press Delete on your keyboard.
Other Settings
-
Select the Other Settings node.
-
Configure these options :
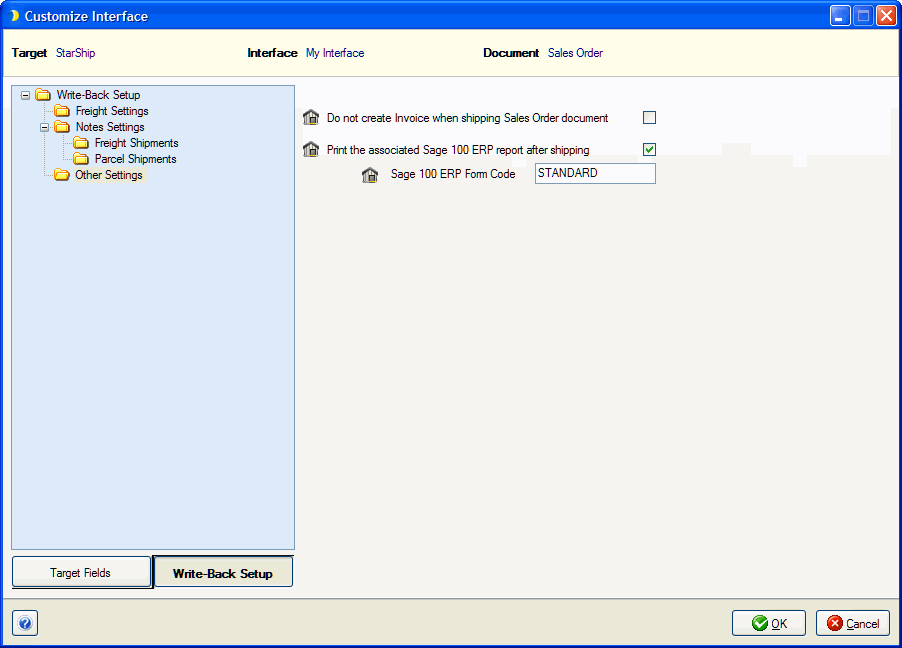
Do not create invoice when shipping Sales Order document
This option is available for Sales Order write-back. When you check this check box, no invoice is created and the Applied Charge is written back to the Sales Order (to Totals > Freight Amount).
StarShip also writes notes back to the Sales Order as a line item comment. Sage 100 has a 2048 character limit to this field. Notes are configurable.
Note : This setting affects whether lot/serial distribution is allowed for Sales Orders (available in Sage 100 v4.5). See Lot/Serial Distribution for more information.
Print the associated Sage 100 report
When checked, StarShip will print the associated MAS report to the default printer. The Sage 100 report is defined in Sage in the Form Code field, after clicking the “Accept” button in the “Shipping Data Entry” dialog, or by clicking the “Quick Print” button. By default, the Form Code field is pre-populated with the default form code, or the last used Form Code, in the print dialog.
Note: This feature does not work in the initial release of Sage 100 2013. The problem is resolved in product update 2 (5.00.2.0). For additional information, see Sage release notes, specifically: Sage 100 printing or preview no longer fails when running through pvxcom. DE 101098 KBID 9000841.
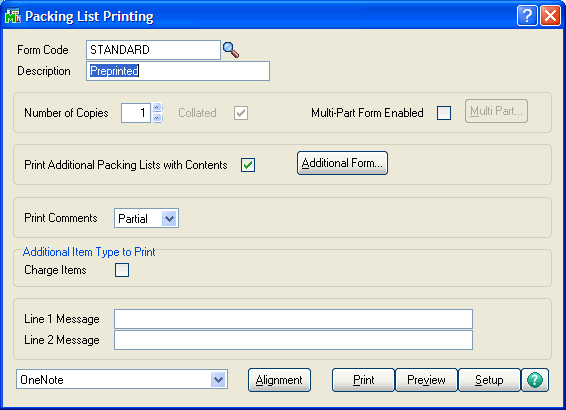
Sage 100 print dialog
The Lookup button next to the Form Code field brings up the list of available forms. The Print Code must be in this list in order for StarShip to use it to print the report.
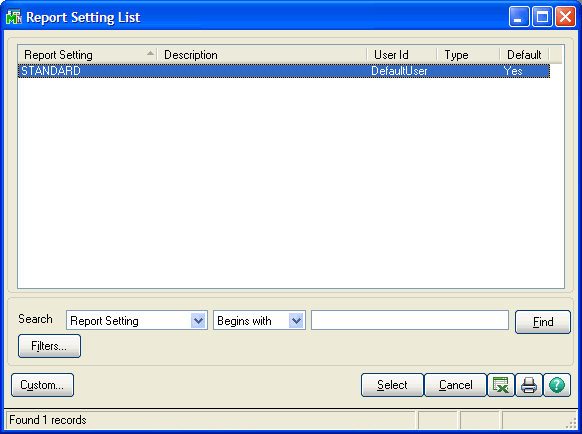
Sage 100 lookup dialog