StarShip's Parcel User-Defined Carrier option allows you to set up an unlimited number of carriers and services. The user-defined carriers and accounts are defined and saved by location.
For each carrier you define, you can :
Note : The Parcel User-Defined Carriers option is a module that is enabled through your StarShip registration.
You access setup by selecting Setup > Carrier Interface > Parcel User-Defined Carriers. Once a carrier has been set up, you can also access the carrier through Maintain > Carriers.
Disable use of Parcel User-Defined Carriers
Check this option on the Main tab if you do not want user-defined carriers to be available on the Ship screen when processing shipments.
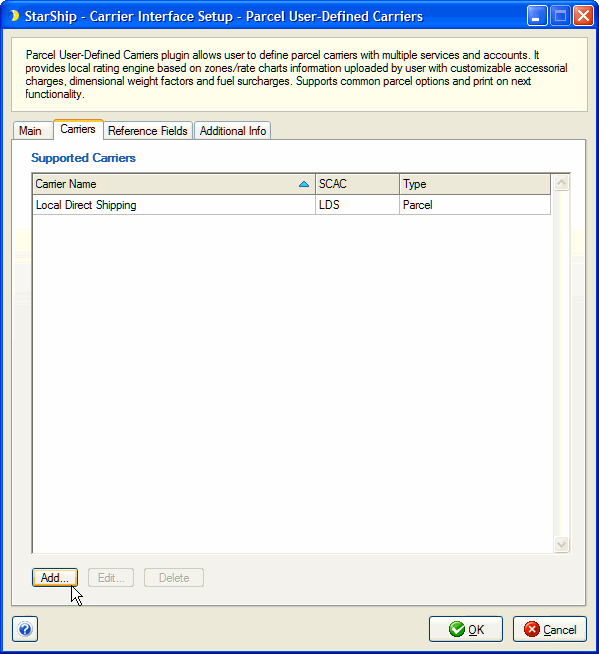
This tab is where you set up the carriers you want to use. You can add, edit, or delete carriers using the appropriate buttons.
Click the Add button to launch the Carrier Setup wizard. The wizard helps you to set up necessary and optional information for each carrier.
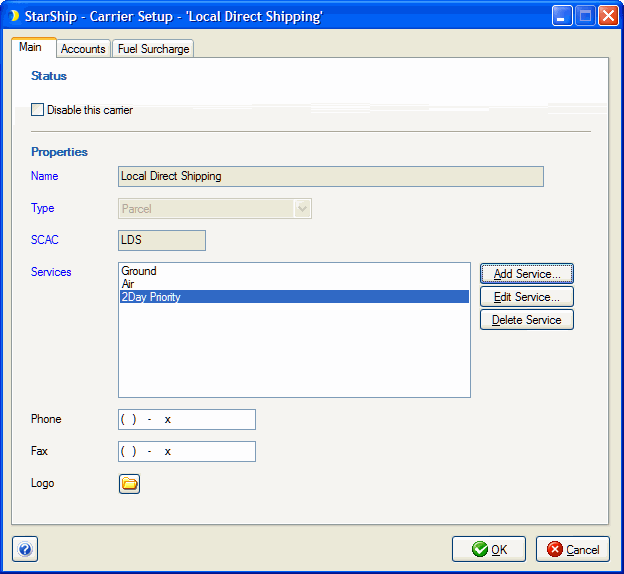
After clicking Add, you will see the following tabs :
The Main tab > Status section allows you to disable the carrier, i.e the carrier will not appear on the Ship screen or be available for shipping.
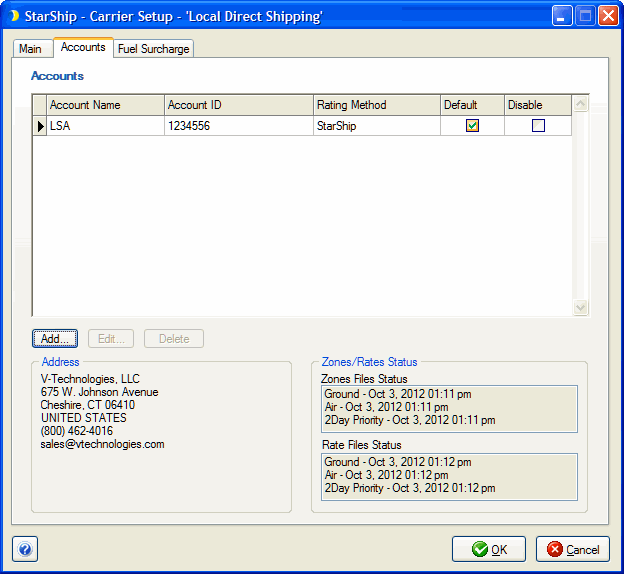
This tab allows you to set up your carrier accounts. You can have multiple accounts for each carrier but you must have at least one account set up in order for the carrier to appear as a selection on the Ship screen.
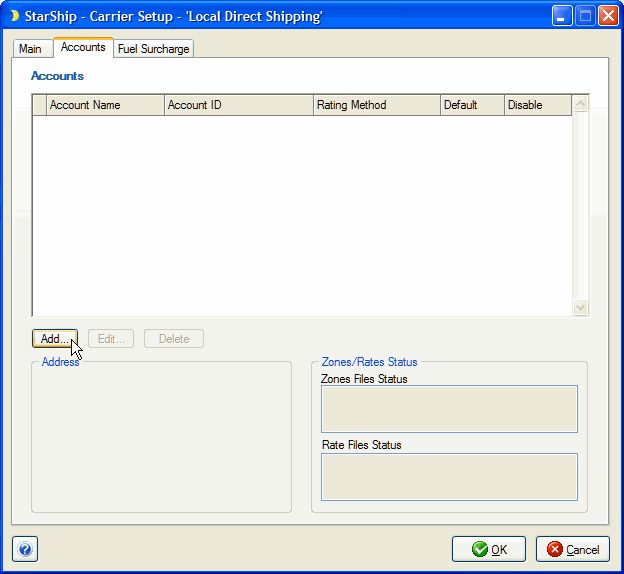
Click Add to add an account and fill out the tabs as described below:
Address Tab
Provide an account name and a unique account number for the account.
Each account must also have a corresponding address. This is the address that will be used as the origin address when rating shipments.
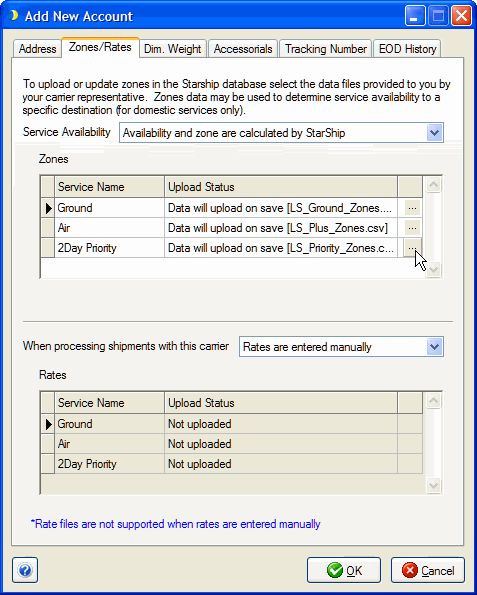
Zones/Rates Tab
StarShip allows you to upload your carrier rates and zones files to use when processing shipments for this carrier. Zones and rates are used when processing domestic shipments only. For International shipments, shipping charges must be entered manually. You do not have to upload zones/rates files.
Service Availability
All services are available for all destinations; zone unassigned
If you don't have a zone file to upload, you should select this option. This allows users to process shipments for this carrier without zone or rate information. All created services will be available for the selected carrier and the shipping charges can be manually entered. (Other Zones/Rates settings on this dialog will be greyed out, and any uploaded Zones data will not be used.)

Availability and zone are calculated by StarShip
This option allows StarShip to use uploaded zone information to calculate service availability and zones for a particular destination. Services without associated zone data will not appear on Ship screen.
When selected, you may additionally choose to enter rates manually or have StarShip calculate rates when processing shipments with this carrier.
Shipping charges can be entered manually or calculated if a corresponding rate file is uploaded.
Uploading Zones (optional)
Zones are uploaded for each Service from a .CSV file provided by your carrier representative.
StarShip supports two Zones file formats :
Zip Low, Zip High, Zone; or
Zip Low, Zip High, Zone, Transit Days, Saturday Delivery (Extended format)
When using the Extended format, "Transit Days" must be an integer and cannot be left blank. Transit Days is used to calculate Estimated Delivery Date.
Additionally, the "Saturday Delivery" column must be a True / False value. Saturday Delivery is also used to adjust Estimated Delivery Date.
Select the Service and click the  button to select the Zones
file. Services that have no corresponding zone information will not appear
on the Ship screen.
button to select the Zones
file. Services that have no corresponding zone information will not appear
on the Ship screen.
 .
.
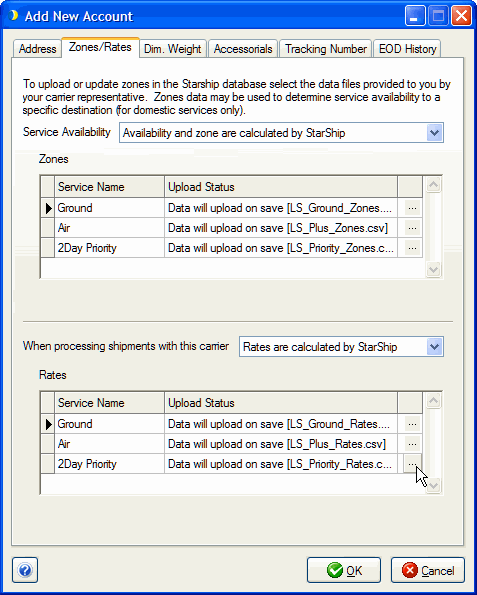
When processing shipments with this carrier
Rates are entered manually
StarShip will use the shipment zone to calculate the zone and service availability only. Rates files are not used and the uploading of rate files is not supported when set to manually enter rates.
Rates are calculated by StarShip
You can upload rates files for each Service. StarShip will use the Rates data to calculate rates based on the shipment zone.
Note : There are no package weight restrictions for either rating method.
Uploading Rates Files
Rates files can be uploaded for each Service from a .CSV file. The supported rate file format is Zone, Weight, Charge.
Note : You do not have to upload rates files for each service. However, when the rates are calculated by StarShip, rating/shipping may fail if the service is selected and rates or zones are not found for this carrier account.
Once you have saved the accounts settings, any
zones and rates files you defined are imported.

The zones and rates file status will appear on the Carrier tab for the
account.
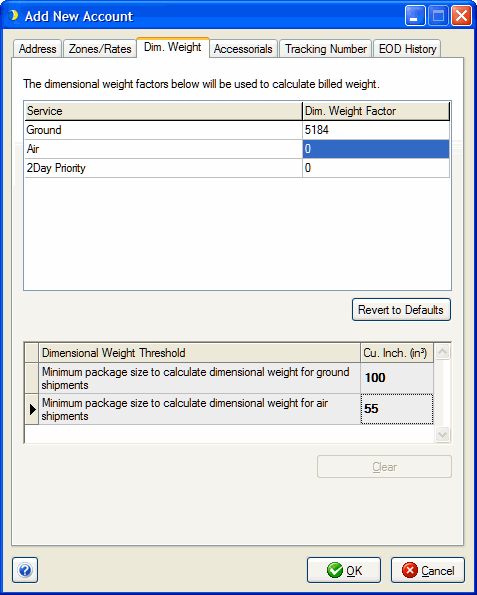
Dim. Weight
Dimensional weight factors are used to calculate the billed weight for a shipment. This tab allows you to adjust dimensional weight factors per account and service.
The default value for all dimensional weight factors is 166.
You can also set the a minimum dimensional threshold
(in cubic inches) before dimensional weight takes effect for Ground and
for Air services. Type the dimensions directly into the "Cu.
Inch." field.
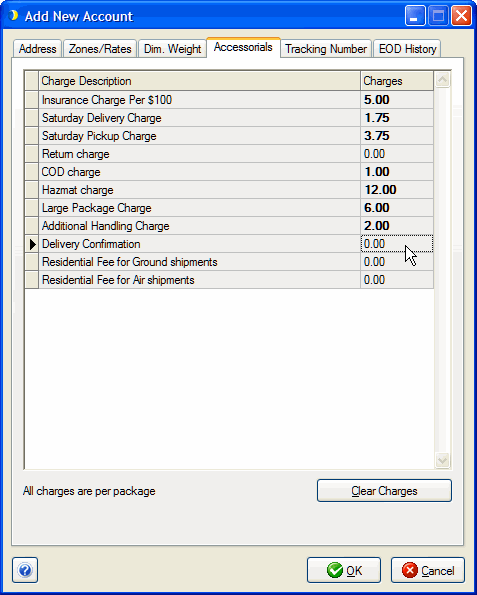
Accessorials
This tab shows supported accessorial options and their corresponding charges. The default value for all charges is 0.00.
Note that the Insurance charge will be used after a $100 minimum Insurance Amount has been met.
StarShip also supports separate Residential surcharges for Ground and Air services.
To enter or change a charge amount, type directly into the "Charge" field.
Tracking Number
Tracking numbers are assigned to each package that is processed in a shipment. StarShip ensures the originality of tracking numbers for 18 months.
Tracking Number Prefix : This information is used as part of the Sample Tracking # field and the actual tracking number that StarShip generates.
Rolling Number Length: This field controls the size of the rolling number. The value can be between 5 and 9.
Rolling Number : A rolling number is required when automatically generating the tracking number and the value entered will be used as the next tracking number. If the number entered is shorter than the length entered in Rolling Number Length, it will be padded with leading zeroes.
Sample Tracking # : This field is for display only. The Sample Tracking # that is displayed is the tracking number that will be assigned to the next package. It will contain the values from the Tracking Number Prefix, Rolling Number, and a check digit. This data displays in the Shipment tab under General Information section and when you click Print Shipment on the toolbar.
![]()
EOD History
This tab shows you posted events for the currently selected account, such
posted shipments or pickup requests. You can utilize the filters at the
top of the window to display specific postings, by Posted Date(s) including
a date range or by status. To filter using a date range, select Range
from the Posted Date drop-down list and then enter a range in the fields
to the right.
The selected posting's details display below the grid.
Save Account
To save the account information and settings, click OK. Any rates and zones files will be uploaded at this point.
Fuel Surcharge
This tab allows you to enter the fuel surcharges by percentage for Ground and/or Air Services. The default values are 0. If no value is set, fuel surcharges are not applied when the shipment is rated.
Reference fields allow you to define additional information for the shipment; for example, you can define a field that you want to print on a report or custom label. StarShip supports up to 3 different reference fields at the package and shipment levels.
Specify the shipment fields to include as reference fields by selecting them from the drop-down lists.
This tab displays the supported billing types and shipment options available for Parcel User-Defined Carriers.