Setup
This section explains how to set up DacEasy so you can ship with StarShip.
Note that you must have Pervasive 10 or higher installed in order for
StarShip to successfully connect to the DacEasy database.
PSQL
10 : General Availability
PSQL 10 : Supported Operating Systems
Download and copy the appropriate
DDF files
In order for an external program
to access a Pervasive database, data dictionary files (DDFs) must be present.
These files define the structure of the database. You can download the
DDFs for free from our website using the links below. Once downloaded,
you will need to extract the zip file(s) to the folders containing the
DacEasy Order Entry and Accounting databases.
Download links
DacEasy 2014 and 2015
DacEasy 2013
DacEasy 2012
DacEasy 2011
DacEasy 16
DacEasy 15
DacEasy 9 - 11 : Download both files
DacEasy 12 - 15 : Download both files
Then, for each company, copy the
DDF files to the AC\Company Name and OE\Company Name
folders.
Note: For DacEasy 15 and higher, extract the DDFs to both the Accounting\Company
Name and Order Entry\Company Name folders. For DacEasy 9 - 11 and 12 -
14 extract the Accounting DDFs to the Accounting\Company Name folder and
the Order Entry DDFs to the Order Entry\Company Name folder.
Create the Database Connection
There are two ways to create the DacEasy database connection, either
through the Pervasive Control Center or through the ODBC
Data Source Manager.
Open
Pervasive Control Center and create a named database for each OE and AC
folder.
To set up a Pervasive to ODBC connection,
the database first needs to be added to the Pervasive Control Center.
On
the "server" machine (where the Pervasive database is located),
go to Start > Programs > Pervasive > (version), and click
the Pervasive Control Center shortcut to open it.
From
Engines > Server Name, right-click Databases and select New >
Database.
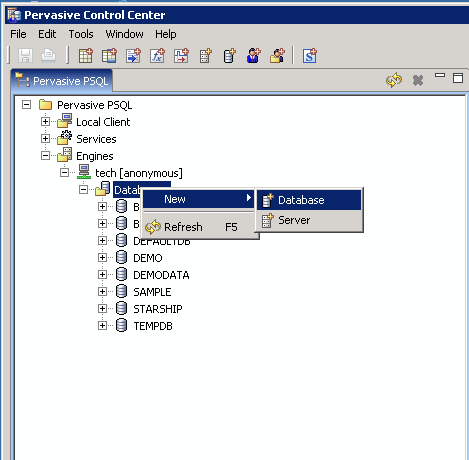
Note : You will need to add two databases for DacEasy in the Control
Center : one for Accounting, and one for Order Entry.
On
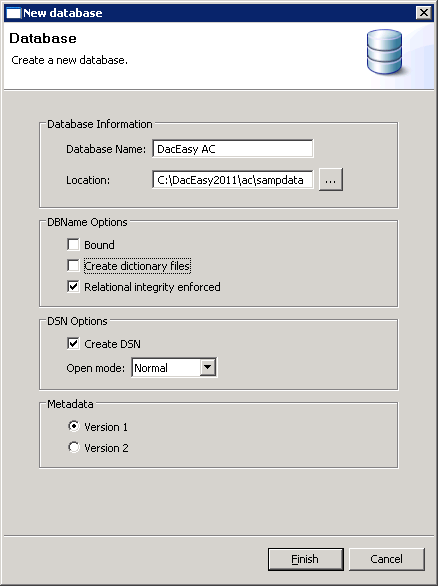
the new database screen, enter a name for the Database and browse
to the location of the database.
Remove
the check mark from the "Create dictionary files" check
box. This prevents the DDFs files copied to the data folder from being
overwritten.
Make sure "Create DSN" is checked so that the data source
is created in Administrative Tools > ODBC Data Sources.
In
Administrative Tools > Data Sources (ODBC), the data sources created
above are shown on the System DSN tab. Notice that these are created
as "Pervasive ODBC Engine Interface."

Create a Data
Source in ODBC Data Source Manager for each named database
Database connections can also be added directly through the Windows
Administrative Tools > Data Sources (ODBC).
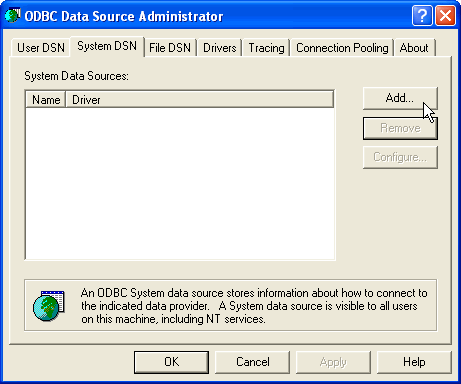
- On the "server" machine (where the Pervasive
database is located), go to Administrative Tools > Data Sources
(ODBC). Click the System DSN tab, and then click Add.
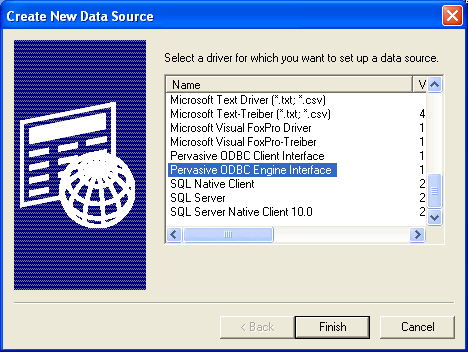
- From the list of Available ODBC drivers, select
Pervasive ODBC Engine Interface.
- On the Pervasive ODBC Engine DSN Setup dialog, click
Create.
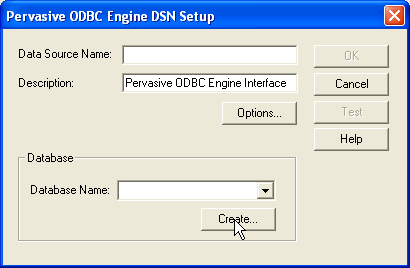
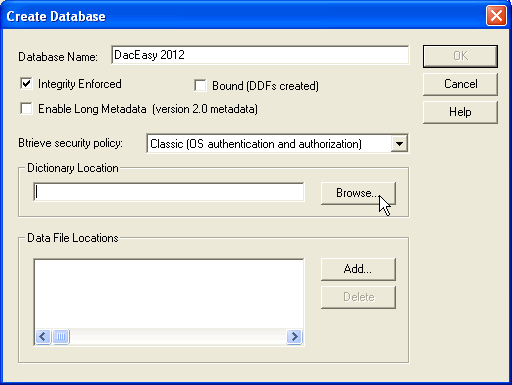
- Enter a Database Name. Under Dictionary Location,
enter or browse to the location of the DacEasy accounting data.
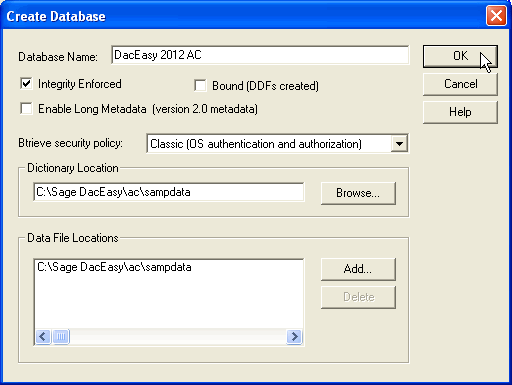
- After selecting the Dictionary Location, the Data
File locations are automatically populated. Click OK to continue.
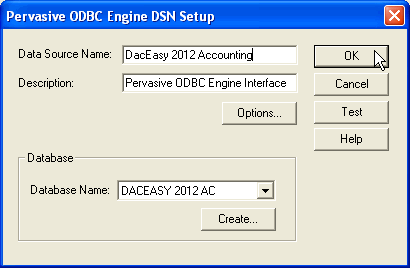
- Enter a name for the Data Source in the field provided.
Then, click OK to finish the ODBC Driver setup for the DacEasy Accounting
Connection.
- Repeat these steps for the DacEasy Order Entry Connection,
this time selecting the path to the Order Entry data in the Dictionary
Location.
If the StarShip client is on a
different computer from the Pervasive database, perform the steps in this
section.
- On the client
computer, go to Administrative Tools > Data Sources (ODBC), and
click the System DSN tab. System DSN is selected so that the data
source will be available to all users who log into this computer.
- Click Add, then
select "Pervasive ODBC Client Interface" on the Create New
Data Source screen.
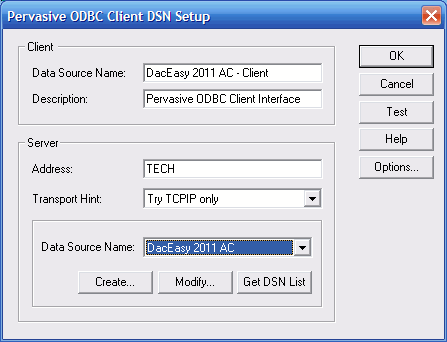
- On the Pervasive
ODBC Client DSN Setup screen, enter a descriptive Data Source Name
to use when StarShip connects to the company. Note: The Data Source
name must
be the same on all client computers.
- In the Server
Address field, enter the computer name of the Pervasive server.
- Click the Get
DSN List button to retrieve the list of data sources from the server.
This will populate the Data Source Name combo box with the list of
Pervasive data sources from the server. If there are more than one,
select the data source created in step 2 and displayed in step 3 above.
Click OK.
Add the company or companies in
the StarShip Client.
This can be done using the Setup
Wizard, or through Financial System Interface Setup.
- Open the StarShip
client and select Setup > Financial System Interface > DacEasy
(Version).
- Select My Companies
and click the Add button. Click the Create Connection button.
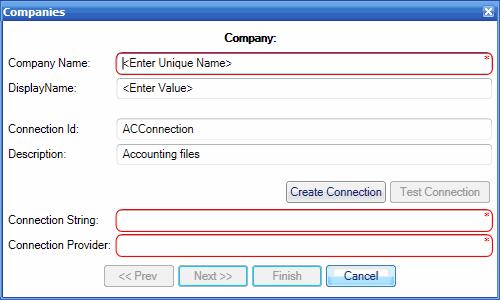
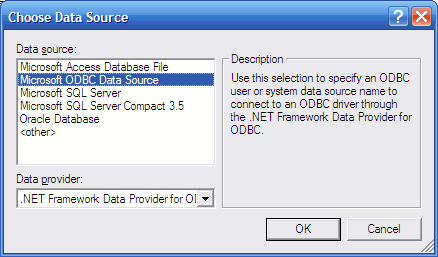
Select Microsoft ODBC Data
Source as the data source and click OK.
Select the Accounting data
source. Click OK.
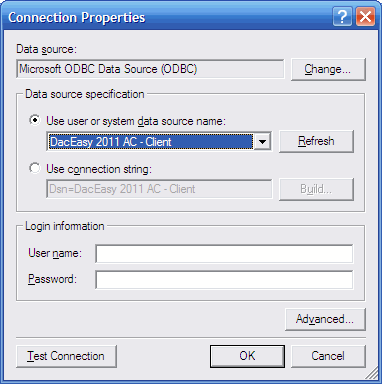
You return to the Companies
dialog (shown in Step 2). Click Next. "Order Entry files"
displays in the description. Select the Order Entry data source. Click
OK.
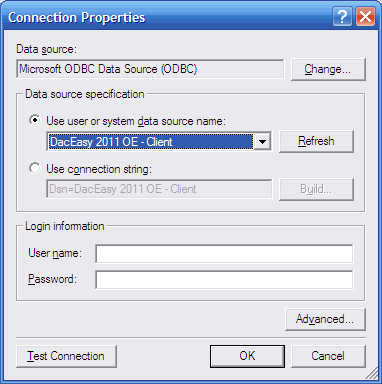
Enter the Company Name and
click Finish.
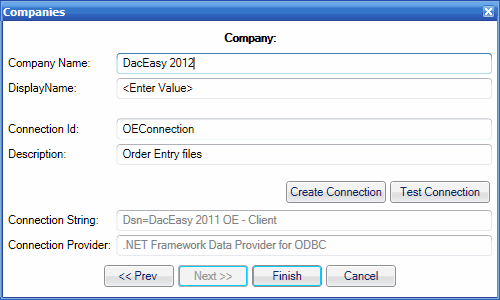
StarShip will confirm that
it has successfully connected to the company. Click OK.
The company now appears in the company list.
Note : When installing Pervasive
Workgroup, there should be a prompt to install as a service or as an application.
Be sure to install Pervasive as a service, that way a user does not need
to be logged in locally on the "Server" machine.


